|
|
|
Porsche, and the Porsche crest are registered trademarks of Dr. Ing. h.c. F. Porsche AG.
This site is not affiliated with Porsche in any way. Its only purpose is to provide an online forum for car enthusiasts. All other trademarks are property of their respective owners. |
|
|

  |

| friethmiller |
 Dec 31 2024, 12:12 PM Dec 31 2024, 12:12 PM
Post
#1
|
|
Senior Member  Group: Members Posts: 1,254 Joined: 10-February 19 From: Austin, TX Member No.: 22,863 Region Association: Southwest Region |
[A softball question for the Ninja and/or others]
This is the cam card that came with my 2357 engine, which was originally built by Rimco/Fat (long block) a few years ago. Can someone explain why with an intake/exhaust of 448, the lift was only set to 327 degrees? I'm about to rebuild my motor and a lot of focus will be directed at piston "deck clearance" and the valve train geometry that wasn't set correctly. Thanks. 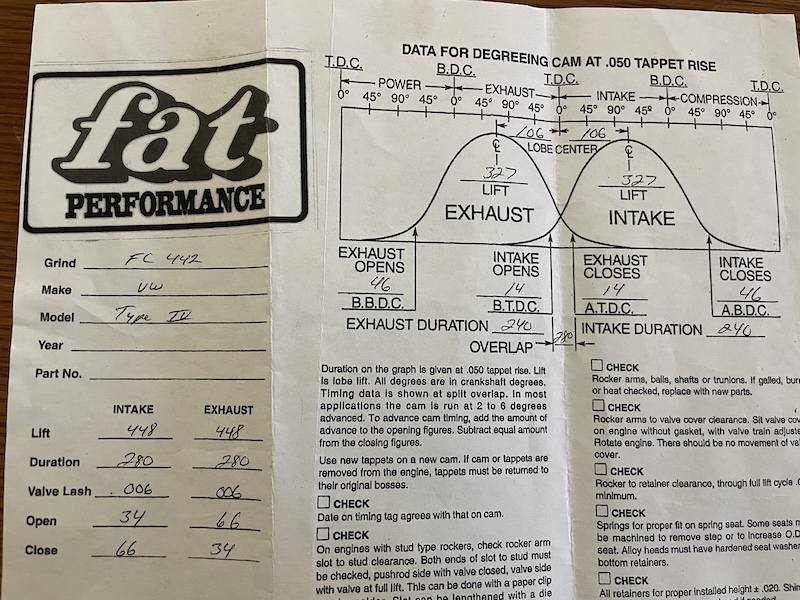 |
   |

 
|
| technicalninja |
Dec 31 2024, 12:31 PM
Post
#2
|
|
Advanced Member Group: Members Posts: 2,531 Joined: 31-January 23 From: Granbury Texas Member No.: 27,135 Region Association: Southwest Region |
It's probably showing actual lift of the lobe.
I believe the rockers are 1.3 ratio so multiply by that. 0.327 at the lobe becomes 0.4251 in total lift. Still seems low... Trying to use a cam card to determine P to V clearance is an exercise in futility IMO. The clay on the top of the pistons is DEFINITELY something you HAVE to do EVEN if the calculations show clearance! (IMG:style_emoticons/default/ninja.gif) What import cam cards seldom show is degrees at ".050" In my book that number is the best method to compare cams at. You don't get much actual airflow below .050 lift and the starting/closing ramps can make the cam look bigger than it actually is. Sadly, that cam has identical lobes for both (exhaust should be more IMO) and it's not asymmetric... Modern cams have a fast open ramp and a slow closing ramp (helps control valve bounce bigtime). The lobe looks "lumpy" on one side. I don't like that cam for that motor unless you have heads that don't exist from what I've seen. (have to be HIGH flow on exh side). |
|
|
|
| friethmiller |
Dec 31 2024, 12:45 PM
Post
#3
|
|
Senior Member Group: Members Posts: 1,254 Joined: 10-February 19 From: Austin, TX Member No.: 22,863 Region Association: Southwest Region |
QUOTE(technicalninja @ Dec 31 2024, 12:31 PM)  It's probably showing actual lift of the lobe. I believe the rockers are 1.3 ratio so multiply by that. 0.327 at the lobe becomes 0.4251 in total lift. Still seems low... Trying to use a cam card to determine P to V clearance is an exercise in futility IMO. The clay on the top of the pistons is DEFINITELY something you HAVE to do EVEN if the calculations show clearance! (IMG:style_emoticons/default/ninja.gif) What import cam cards seldom show is degrees at ".050" In my book that number is the best method to compare cams at. You don't get much actual airflow below .050 lift and the starting/closing ramps can make the cam look bigger than it actually is. Sadly, that cam has identical lobes for both (exhaust should be more IMO) and it's not asymmetric... Modern cams have a fast open ramp and a slow closing ramp (helps control valve bounce bigtime). The lobe looks "lumpy" on one side. I don't like that cam for that motor unless you have heads that don't exist from what I've seen. (have to be HIGH flow on exh side). @technicalninja - Good info. BTW, my heads were completely rebuilt and ported with larger valves (44x38) + all new hardware. |
|
|
|
| technicalninja |
Dec 31 2024, 12:50 PM
Post
#4
|
|
Advanced Member Group: Members Posts: 2,531 Joined: 31-January 23 From: Granbury Texas Member No.: 27,135 Region Association: Southwest Region |
looking again that whole cam card is at .050!
Showing 240 at 0.050 on both... I'd add 5-10 on intake, 10-15 on exhaust. Push the LSA out to 112-114, asymmetric lobes, Bee-hive springs. It would be interesting to see what the specs are on a modern Raby cam for that engine combo. |
|
|
|
| friethmiller |
Dec 31 2024, 01:09 PM
Post
#5
|
|
Senior Member Group: Members Posts: 1,254 Joined: 10-February 19 From: Austin, TX Member No.: 22,863 Region Association: Southwest Region |
QUOTE(technicalninja @ Dec 31 2024, 12:50 PM) looking again that whole cam card is at .050! Showing 240 at 0.050 on both... I'd add 5-10 on intake, 10-15 on exhaust. Push the LSA out to 112-114, asymmetric lobes, Bee-hive springs. It would be interesting to see what the specs are on a modern Raby cam for that engine combo. So, would you recommend a 494 Web cam or the like? |
|
|
|
| technicalninja |
Dec 31 2024, 01:38 PM
Post
#6
|
|
Advanced Member Group: Members Posts: 2,531 Joined: 31-January 23 From: Granbury Texas Member No.: 27,135 Region Association: Southwest Region |
I'd have to see the cam card on it.
I'd lean towards talking to LN engineering regarding the cam. I'd ask them "cam specs, asymmetric and LSA degrees?" I wonder if they will answer. Their big cam 9520 will probably be better than what's in there now. They may have other stuff available that they don't list on their website. Their stuff is on the pricey side, but they should know SHITLOADS more than me... What is your set up? Static compression ratio? Nickies or steel jugs? Stroke and bore? The exhaust port and the strength of the cylinder head near the exhaust seat is the Achilles heel of the T4 IMO. It's the MAIN reliability fault that pushed me away from using the T4. Fixing it looks like "completely new design head casting" is the best method... I've decided to "embrace the water" and convert. I want 300whp as well! And my shit will be BONE ASS stock! At least for a Camaro or Boxster... I have yet to see a wounded LGX; some of my customers have 200K+ miles. Trannies, AC systems, electronics have trouble. Not the engines! All they do it turn hydrocarbons to heat (and beat the dogshit out of the 8 speed autos)! |
|
|
|
| technicalninja |
Dec 31 2024, 02:13 PM
Post
#7
|
|
Advanced Member Group: Members Posts: 2,531 Joined: 31-January 23 From: Granbury Texas Member No.: 27,135 Region Association: Southwest Region |
Changing cam in a T4 means "all the way down".
I'd do a bunch of little tests BEFORE teardown. I'd properly tune what you have FIRST! You running a WB yet? No way I'd make big ass changes before I knew exactly what I wanted to improve. I'd have 1 or 2 WBs (depending on exhaust). CHTs on all plugs (for testing, for daily use just one under #3) and EGT (prefer 4 during provisioning). Knock sensors on both banks. I'd be stand-alone FI as well. COP, Sequential with 1000cc injectors. Center of injection pulse timed to intake lobe centerline. Only inject into a moving airstream! I'd want to be able to internally log a bunch of stuff And after a major amount of tuning, I'd be ecstatic with 200... Which IS SAD! The base Boxster I have (2.5L) has 200 stock! |
|
|
|
| friethmiller |
Dec 31 2024, 02:50 PM
Post
#8
|
|
Senior Member Group: Members Posts: 1,254 Joined: 10-February 19 From: Austin, TX Member No.: 22,863 Region Association: Southwest Region |
Ok, I've changed to name of this thread to handle my rebuild of this engine. This engine was the car's original 1.8L. I had the heads redone with 44x38 valves, the case work included: align-bored, oil galleys ported, and relieving in order to handle a new 82mm crankshaft. The JE pistons are 96mm with steal jugs and new 5.325 H-rods.
The build and rebuild of this engine 2 years ago is a bit of a long and sad story. Let's just say, Fat Performance's build didn't run more than 30 mins before blowing up. I was so upset at Fat, who refused to take any responsibility. Saying they only did a "long block" and it wasn't a "full build"... blah, blah, blah. I told them my opinion of their service, where to stick it, and decided to rebuild the engine myself. 914 world got me through the short-block process however, on the long block I never really checked the piston deck height. Fat had used two large shims so I just reassembled everything like they did (mistake #1). I never checked valve geometry either (mistake #2). What got me to drop the engine were the metal flakes in my oil screen. I drive / watch this engine like a spy plane so I was pretty quick to catch the issue, IMO. 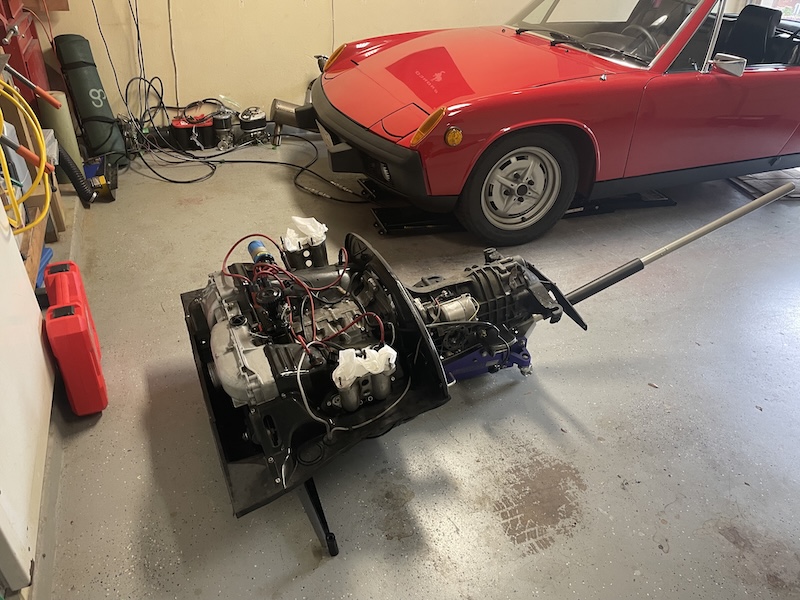 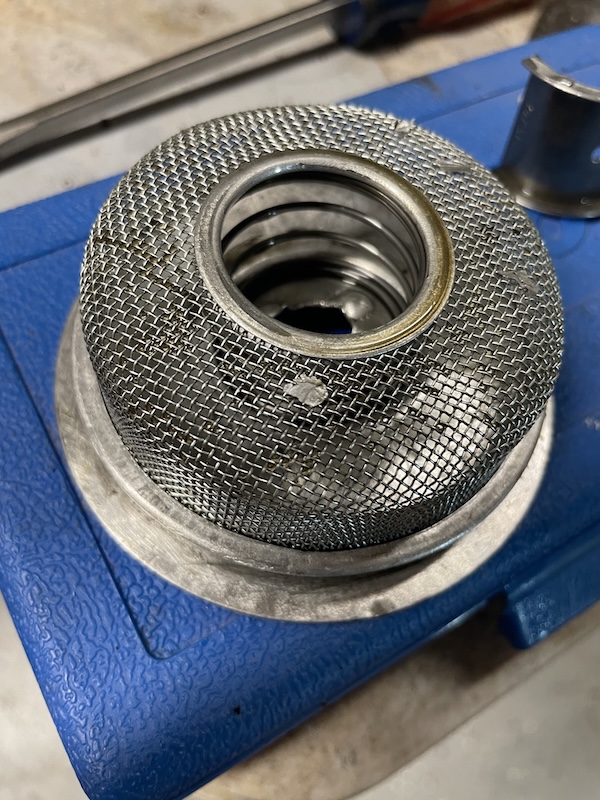 During disassembly, I found a mushroomed pushrod where the end just fell out in my hand. The corresponding lifter was damaged as well. This damage however didn't account for the metal in the oil screen, though. Later, after the block was split and the cam was removed, I found the source to be the thrust surfaces on the #1 Cam bearing. To me this screams bad valve geometry / push-rod length. [Opinions on this are welcome, of course] 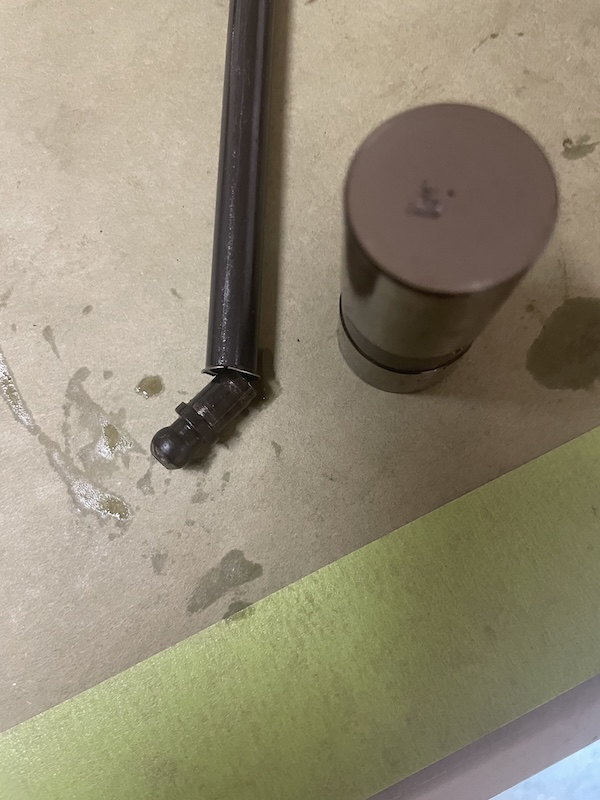 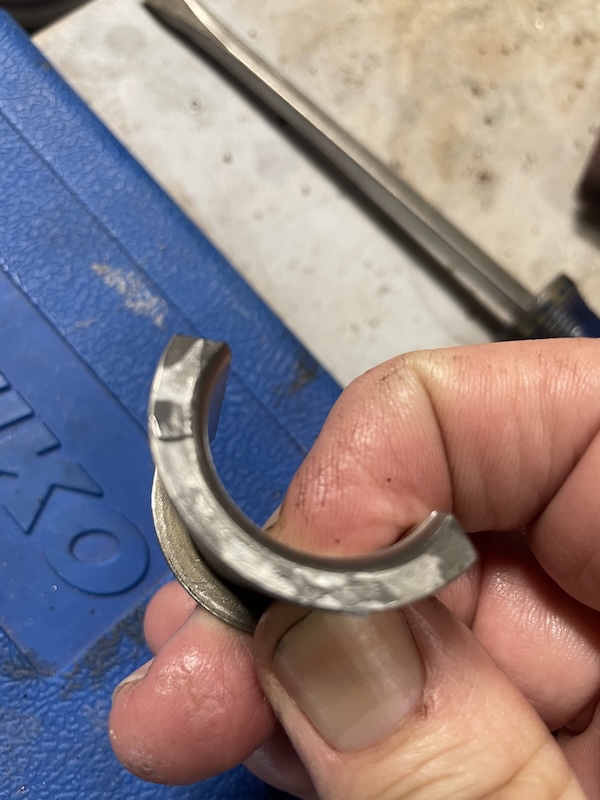 My goal is to rebuild this engine yet again but this time do it RIGHT! (IMG:style_emoticons/default/blink.gif) Anyways... first order of business is getting the cylinder registers decked. Fat told me it didn't need to be done. The small leaks at the cylinder / head say otherwise. (IMG:style_emoticons/default/headbang.gif) I learned a lot last time, I can't wait to see how much knowledge I gain this time around. |
|
|
|
| technicalninja |
Dec 31 2024, 03:28 PM
Post
#9
|
|
Advanced Member Group: Members Posts: 2,531 Joined: 31-January 23 From: Granbury Texas Member No.: 27,135 Region Association: Southwest Region |
WOW!
Was that engine in the car the time you visited? All of your cam shit is DEAD! I wouldn't trust a bit of it. That "super deluxe" kit from LN is looking better. No register milling? The new "machined" finish is almost worth it alone. On an MLS gasket it's a requirement... (IMG:style_emoticons/default/WTF.gif) Yet another story of ineptitude at the "professional" shop level... (IMG:style_emoticons/default/headbang.gif) (IMG:style_emoticons/default/headbang.gif) (IMG:style_emoticons/default/headbang.gif) (IMG:style_emoticons/default/headbang.gif) 82 is BIG! I would expect camshaft interference is more critical at this level. Another reason to choose LN maybe... You need to learn how to do simple "blue-printing" on the engine. I can HELP! (IMG:style_emoticons/default/ninja.gif) |
|
|
|
| technicalninja |
Dec 31 2024, 03:39 PM
Post
#10
|
|
Advanced Member Group: Members Posts: 2,531 Joined: 31-January 23 From: Granbury Texas Member No.: 27,135 Region Association: Southwest Region |
Pics please!
Clean and label all of the split bearings. Crankshaft showing journals. Full bearings interior if possible. Tops of pistons before and after cleaning. sides of pistons/bores. I can look at "old" bearings and see trouble. Sometimes the old bearings are good enough that I reuse them, especially on a recent build. Some of what you have may be usable, but I'd no longer trust anything about the builder... Picks of the carnage please Sir! |
|
|
|
| friethmiller |
Dec 31 2024, 04:44 PM
Post
#11
|
|
Senior Member Group: Members Posts: 1,254 Joined: 10-February 19 From: Austin, TX Member No.: 22,863 Region Association: Southwest Region |
QUOTE(technicalninja @ Dec 31 2024, 03:39 PM) Pics please! Clean and label all of the split bearings. Crankshaft showing journals. Full bearings interior if possible. Tops of pistons before and after cleaning. sides of pistons/bores. I can look at "old" bearings and see trouble. Sometimes the old bearings are good enough that I reuse them, especially on a recent build. Some of what you have may be usable, but I'd no longer trust anything about the builder... Picks of the carnage please Sir! Yes, this is the car/engine you saw in action this spring. In fact, the engine was running great the entire time - even the day I dropped it from the car. However, it always seemed to run rich and backfired a lot. This leads me to the deck height issue. I forget what you called it [in that other build thread] but, I think it was an issue with this engine. You'll see the build up of carbon on the intake valves and pistons/heads to be too severe for only 6,000 miles. I've spent several days cleaning everything up. I have already mic'd the crank/rod journals. I'll post this info and pics soon! P.S. If anyone thinks this engine issue is upsetting me, you are wrong! I love this sh1t!! (IMG:style_emoticons/default/biggrin.gif) |
|
|
|
| friethmiller |
Dec 31 2024, 05:39 PM
Post
#12
|
|
Senior Member Group: Members Posts: 1,254 Joined: 10-February 19 From: Austin, TX Member No.: 22,863 Region Association: Southwest Region |
Engine pics
Tear down: 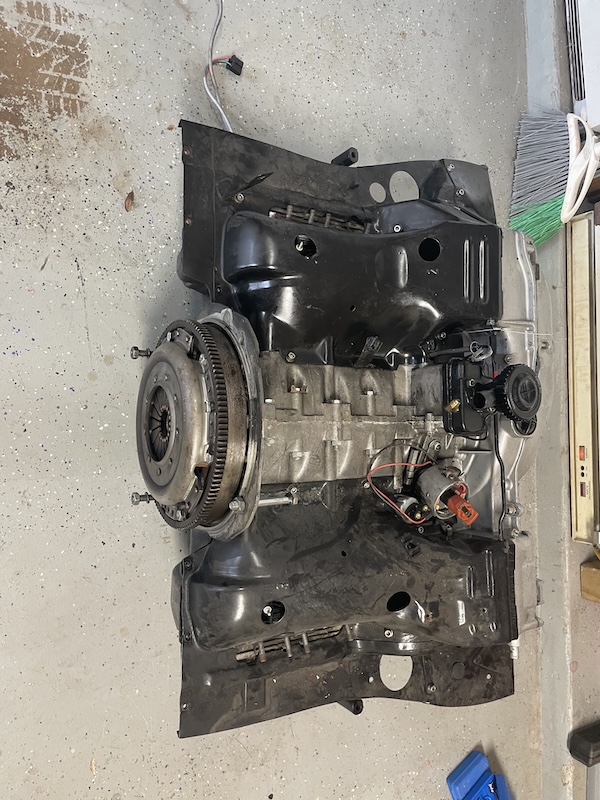  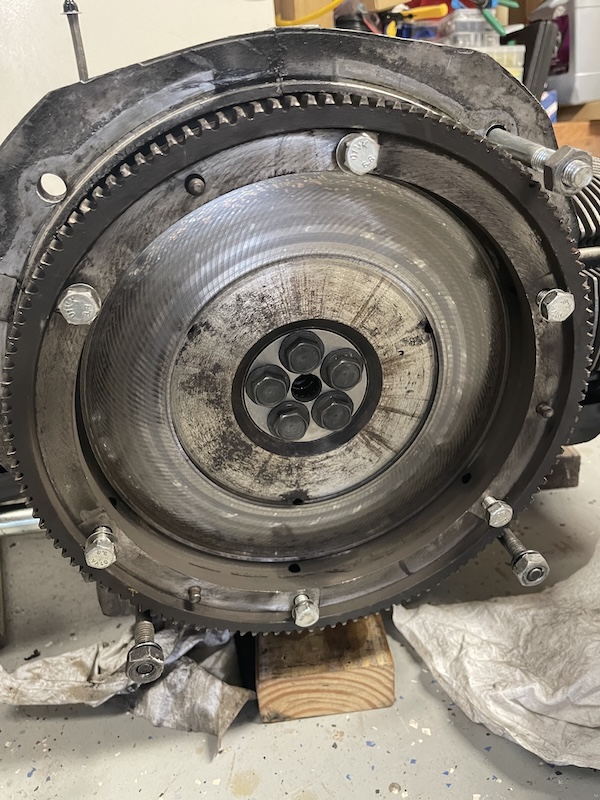 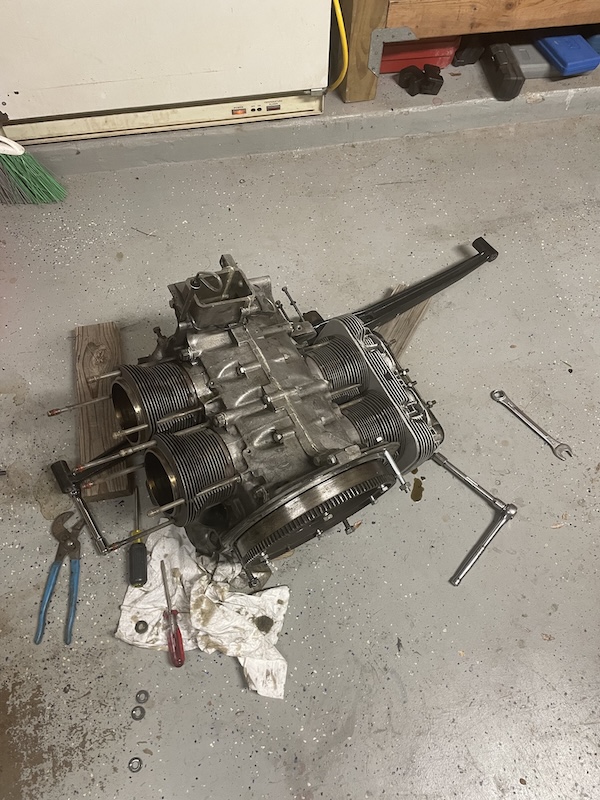 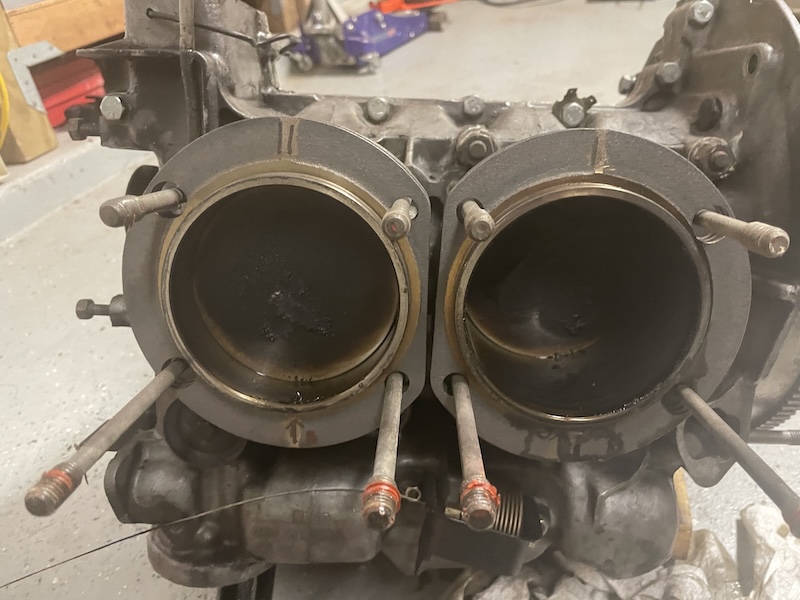 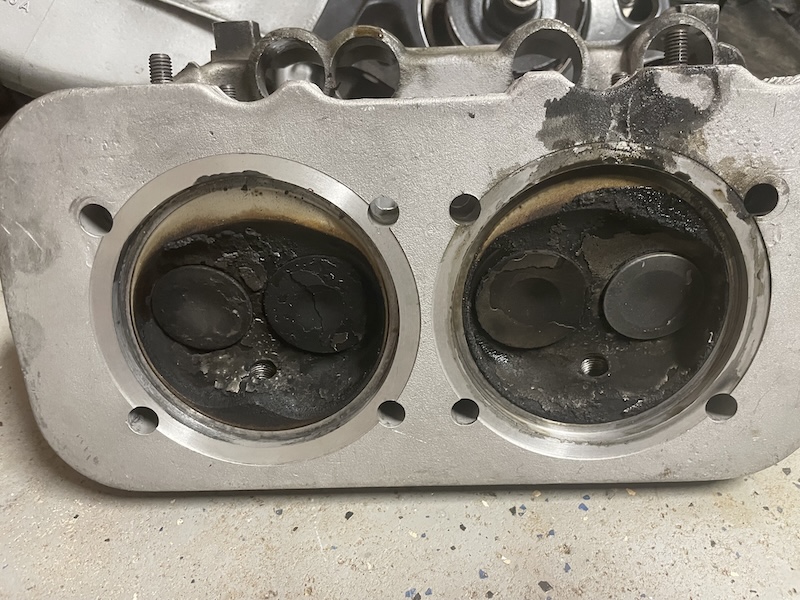 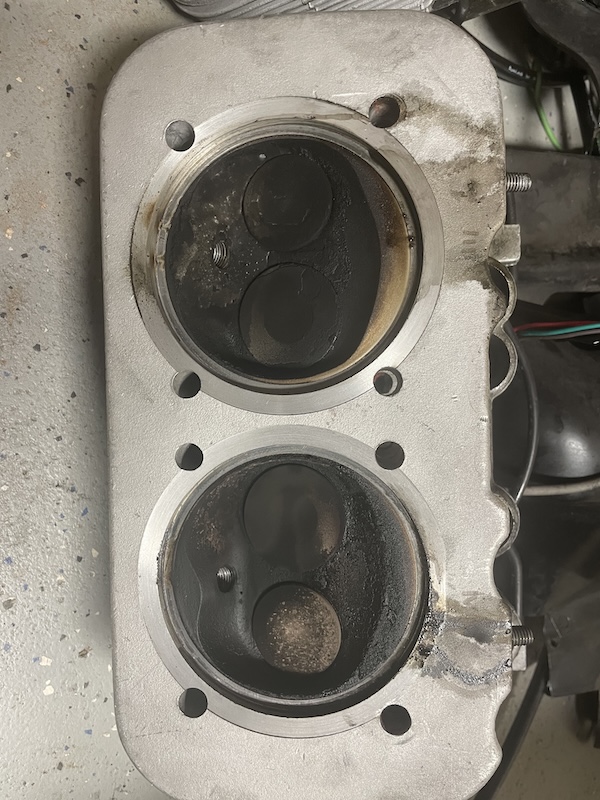 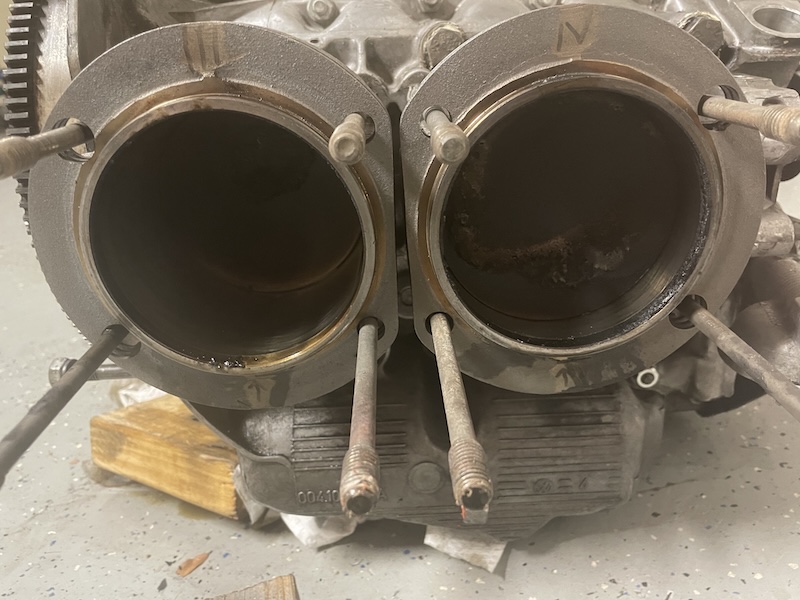 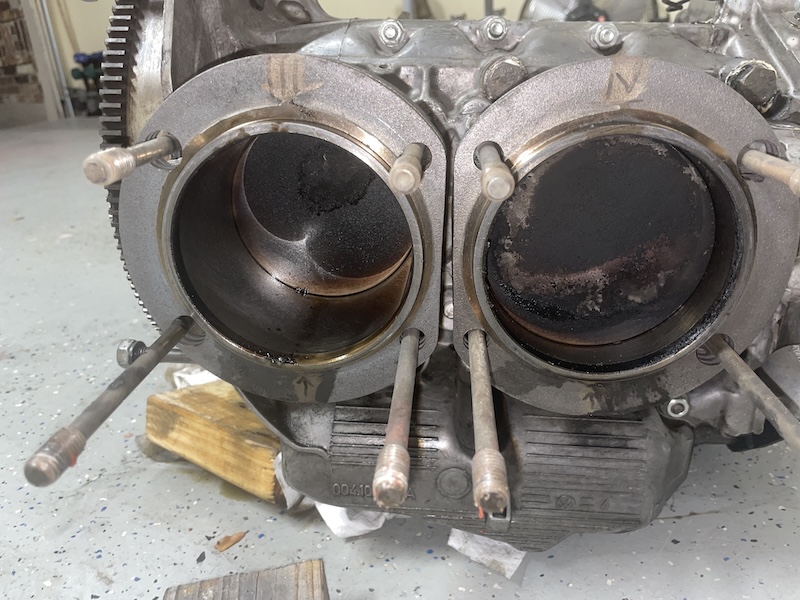 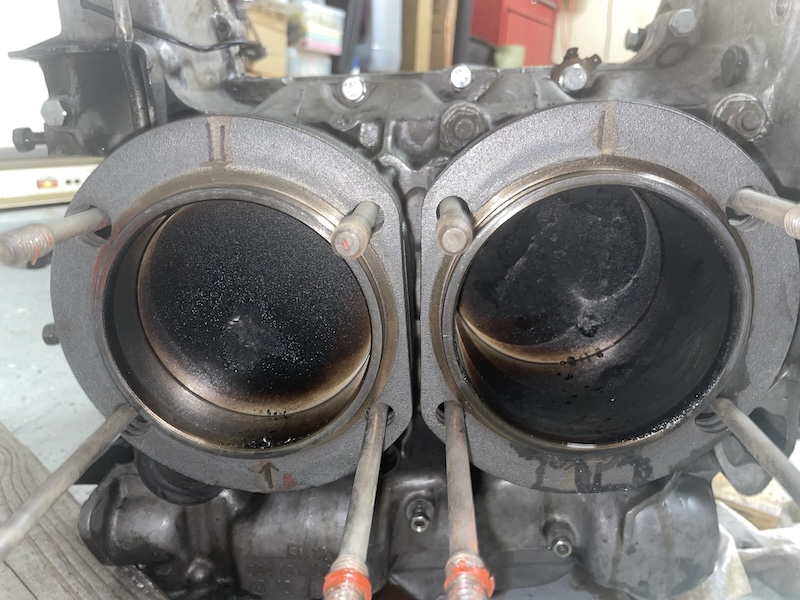 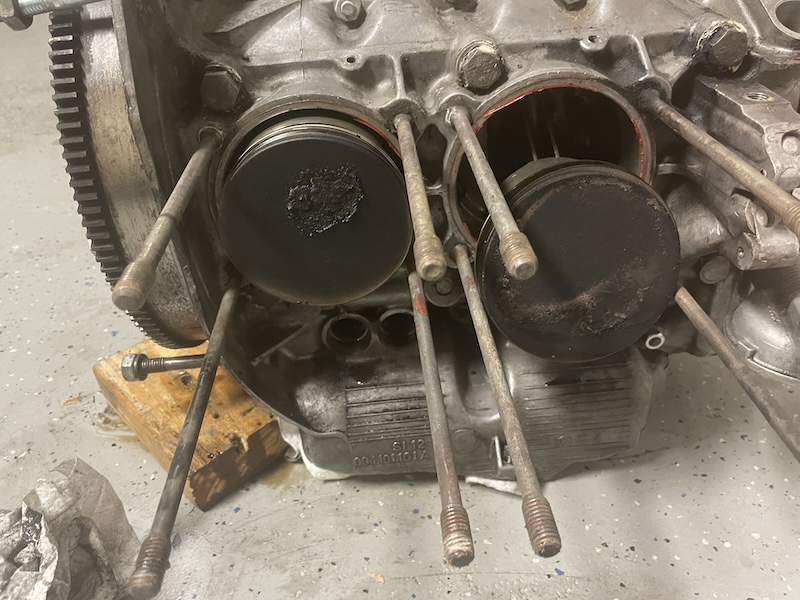 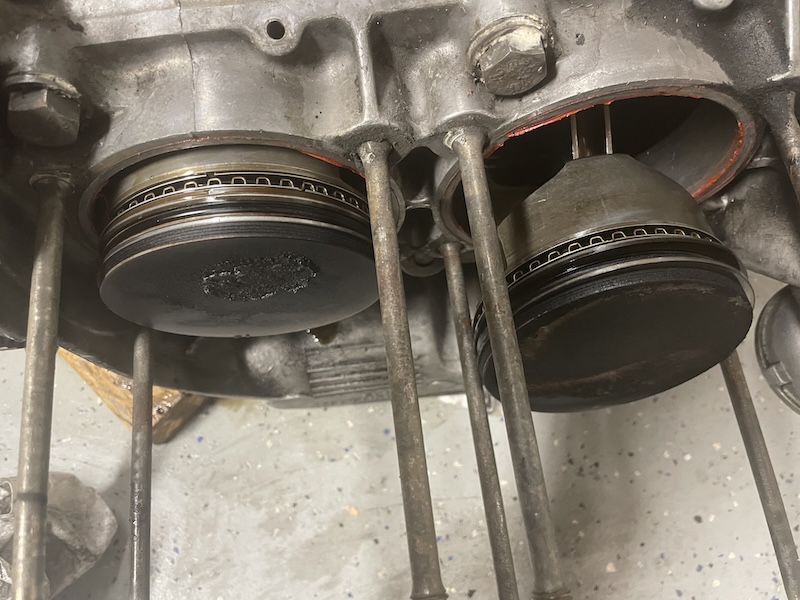 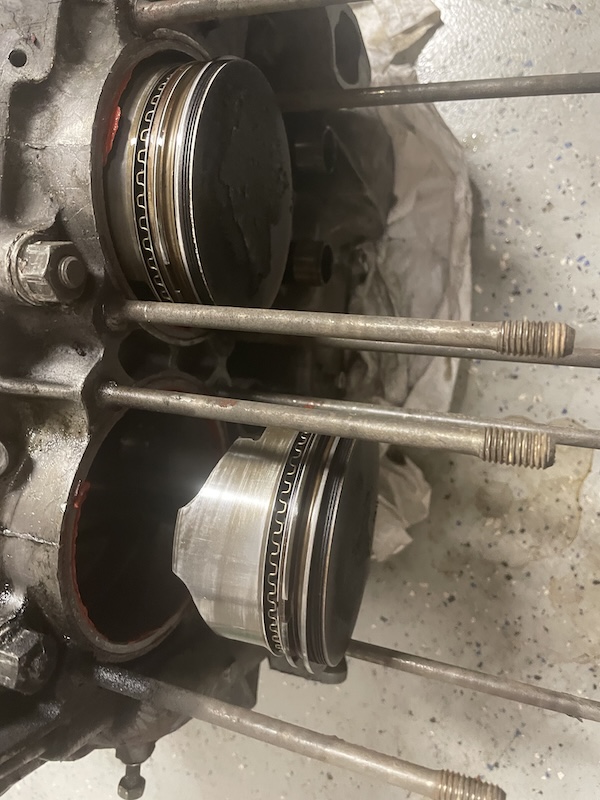 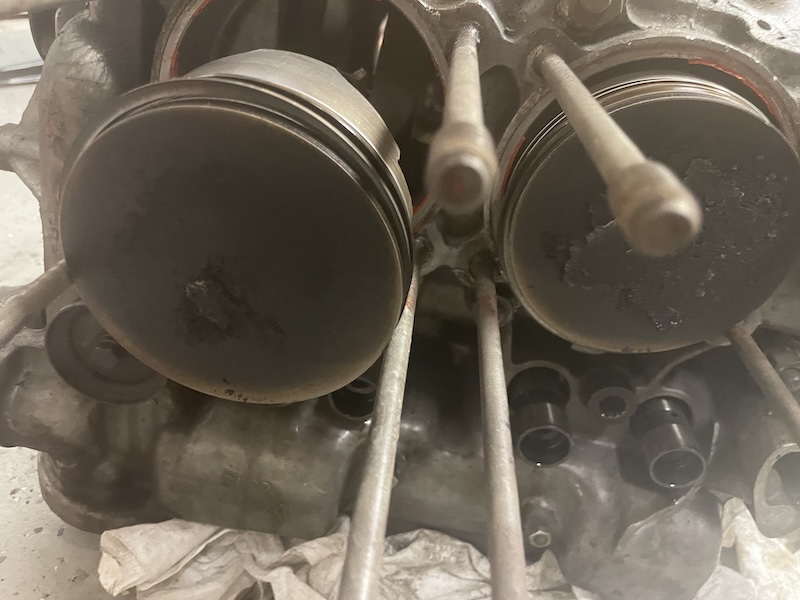  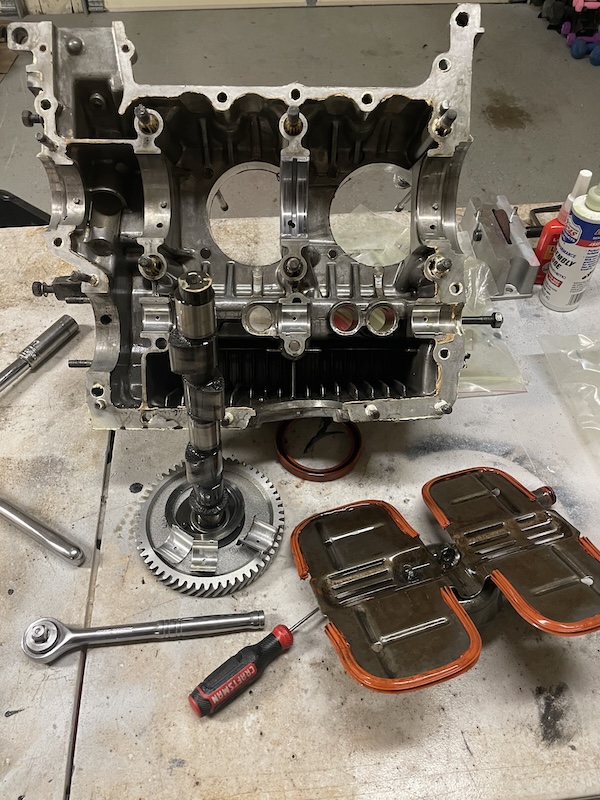 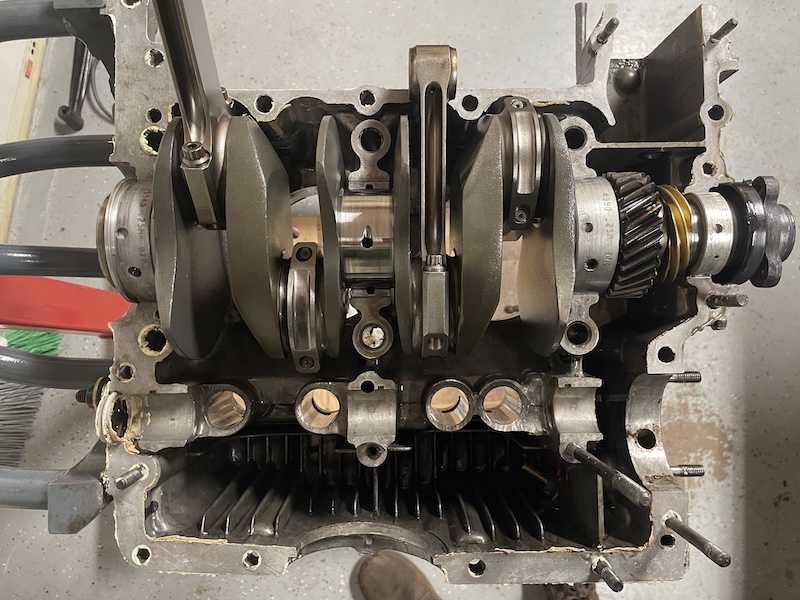 #3 Main (split) Bearing. Notice scoring on backside. Plastigauge says clearance is between .002 - .003 but closer to .003 (too much clearance). 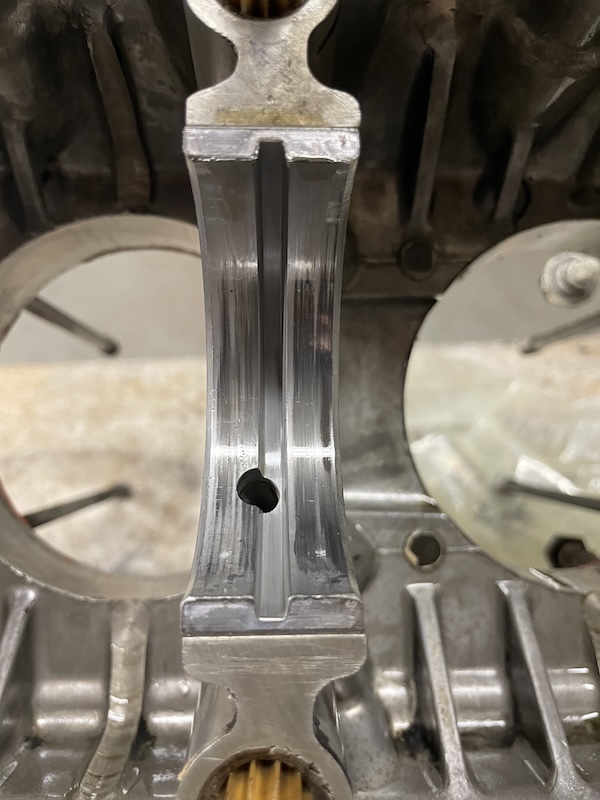 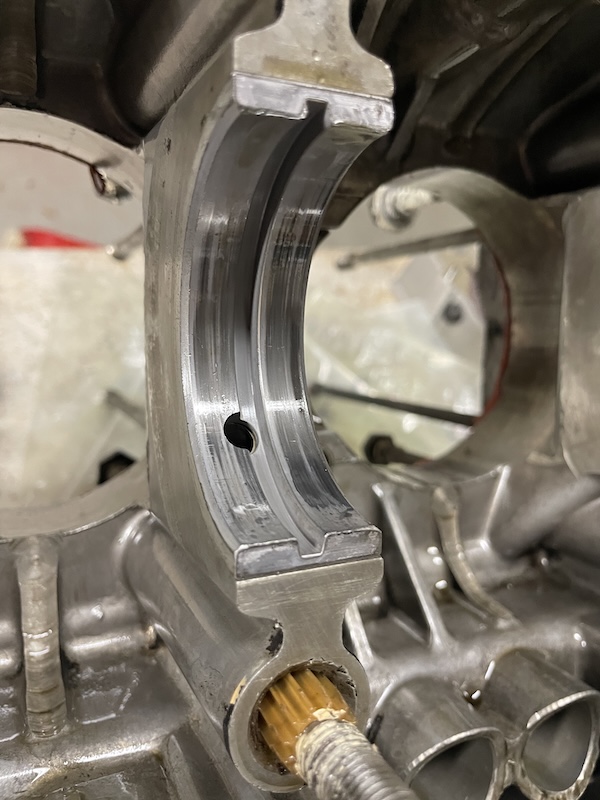 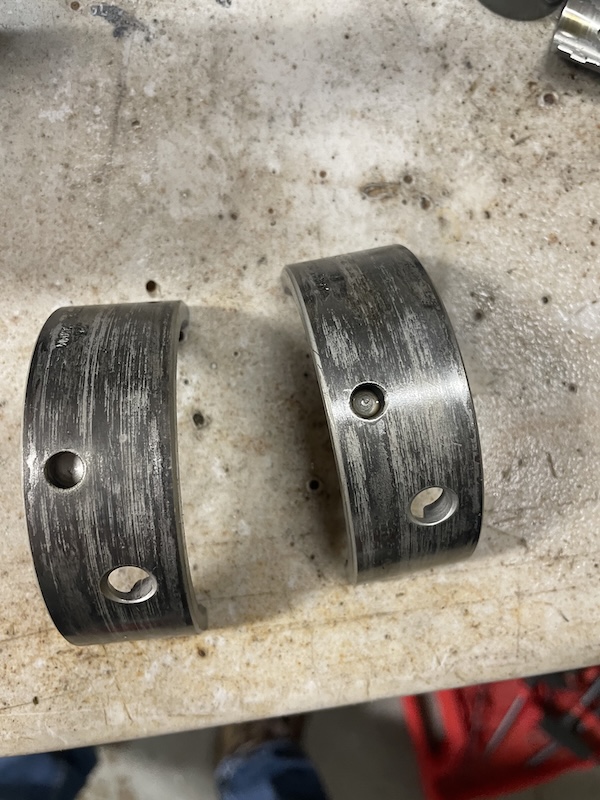 More pics coming, standby... |
|
|
|
| friethmiller |
Dec 31 2024, 07:06 PM
Post
#13
|
|
Senior Member Group: Members Posts: 1,254 Joined: 10-February 19 From: Austin, TX Member No.: 22,863 Region Association: Southwest Region |
More Pics
Camshaft: 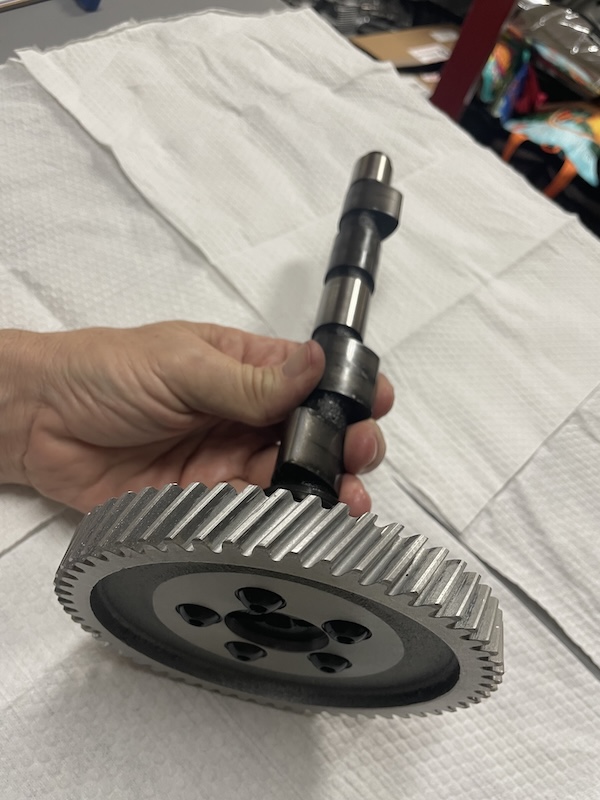 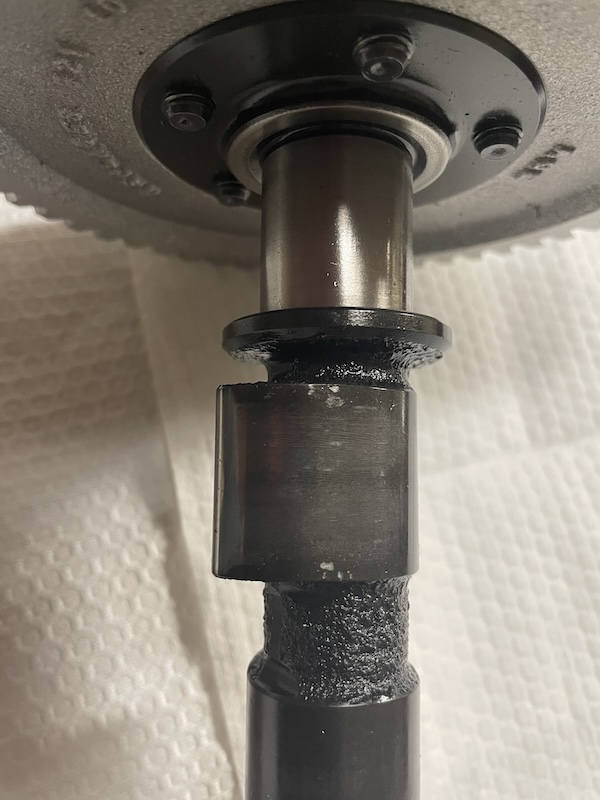 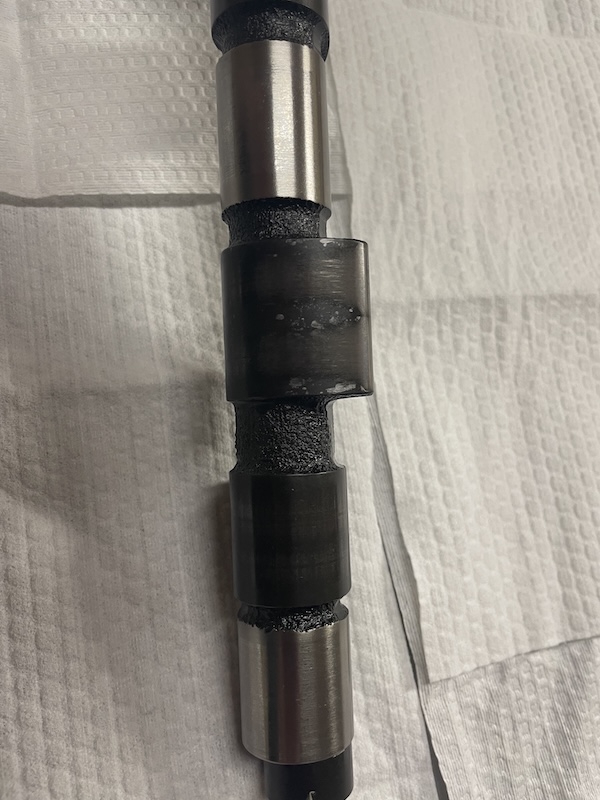 Camshaft Bearings: 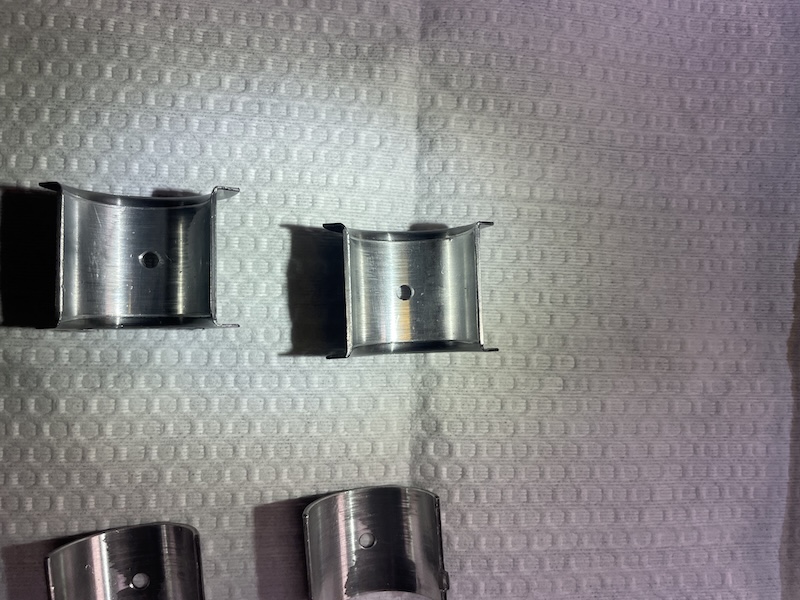 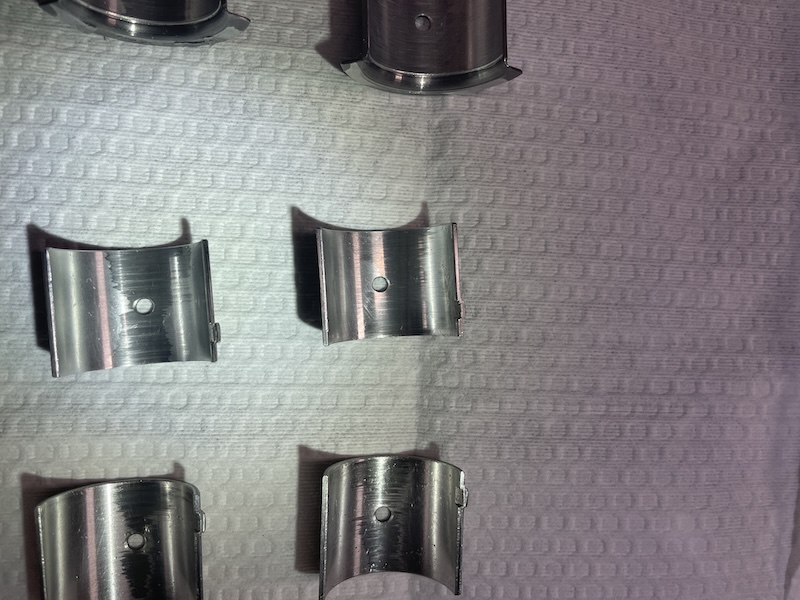 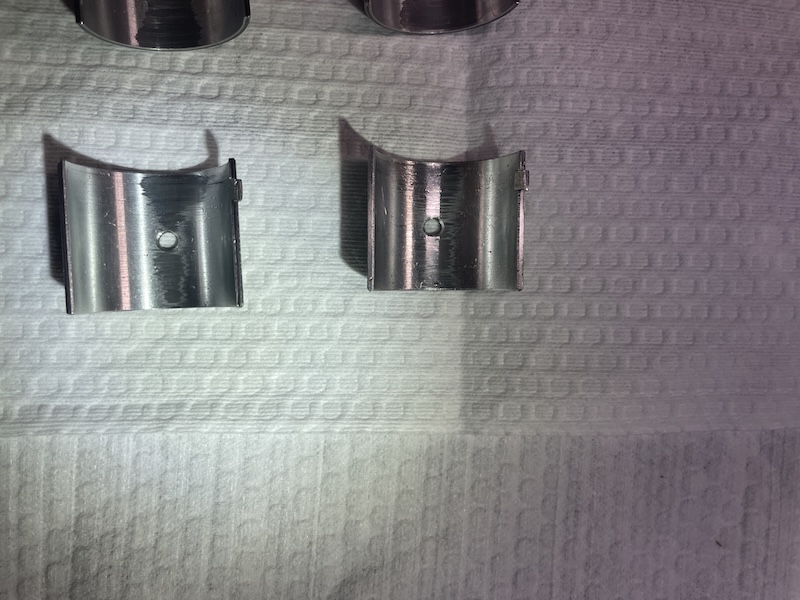 Lifters: 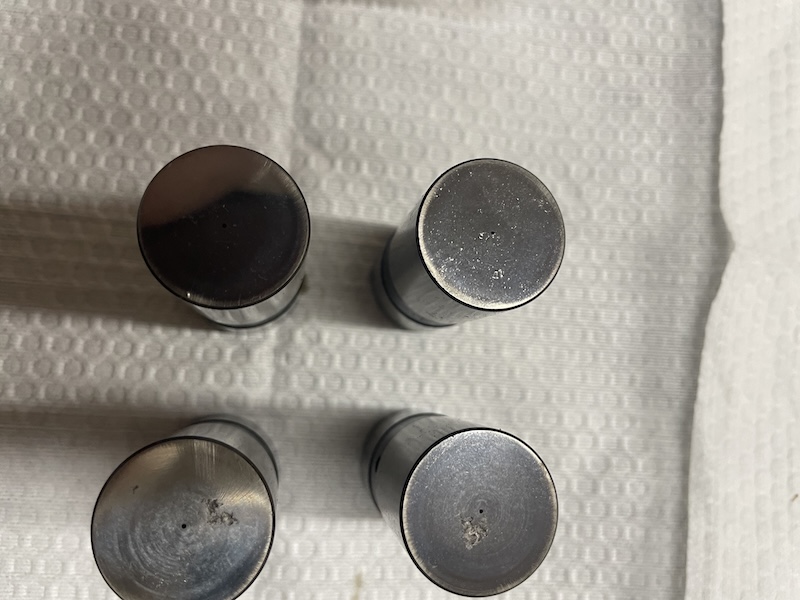 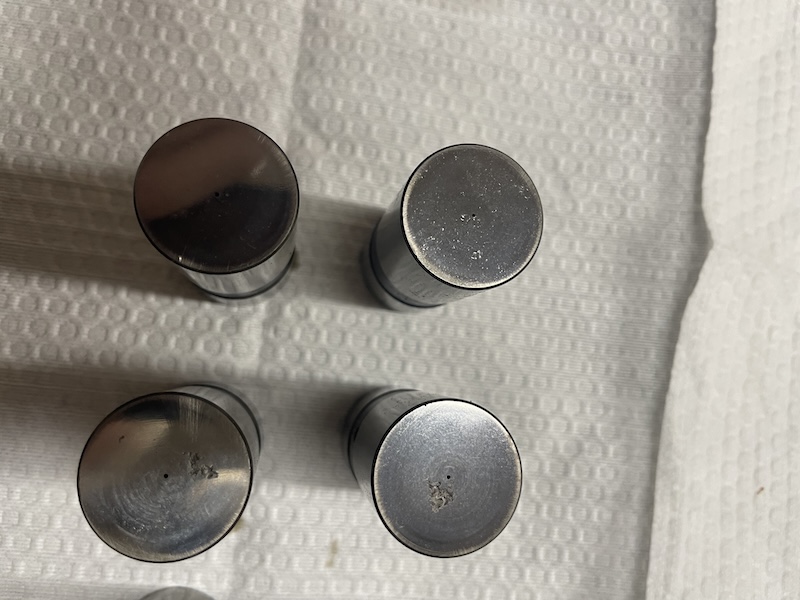 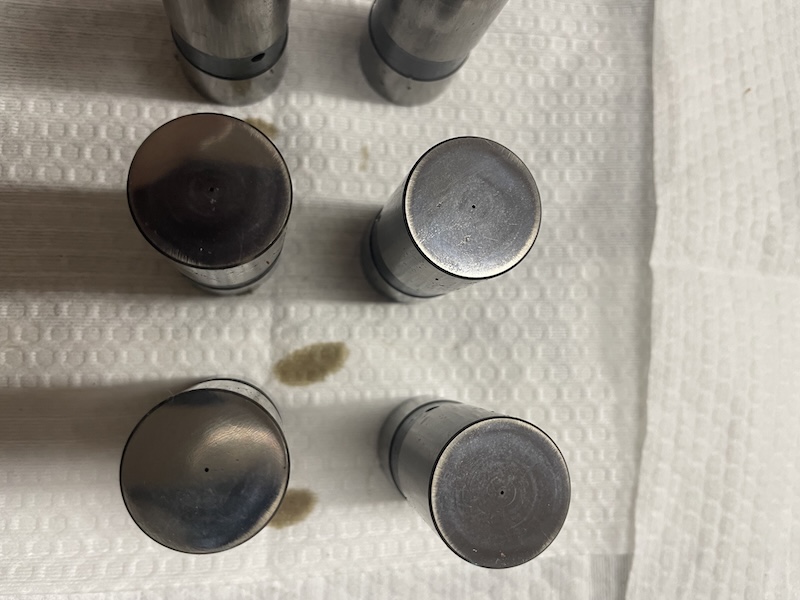 Connecting Rods: 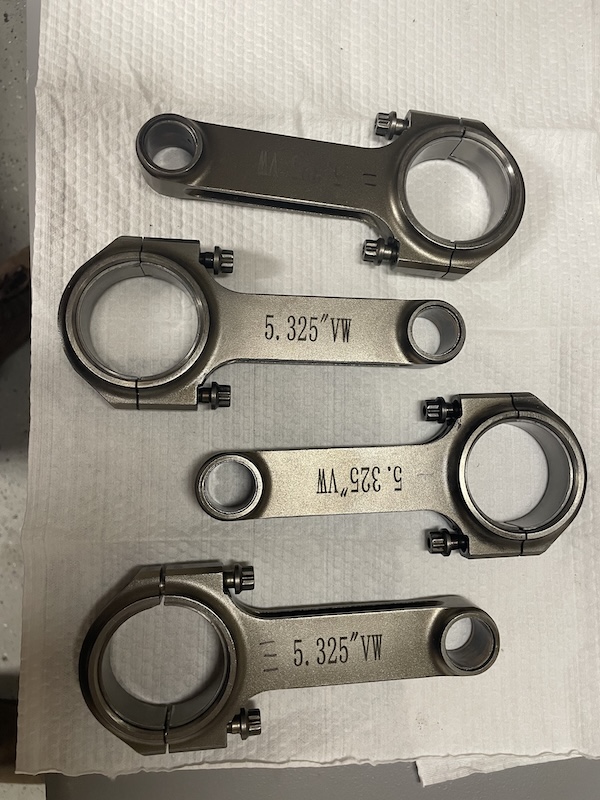 Crankshaft: 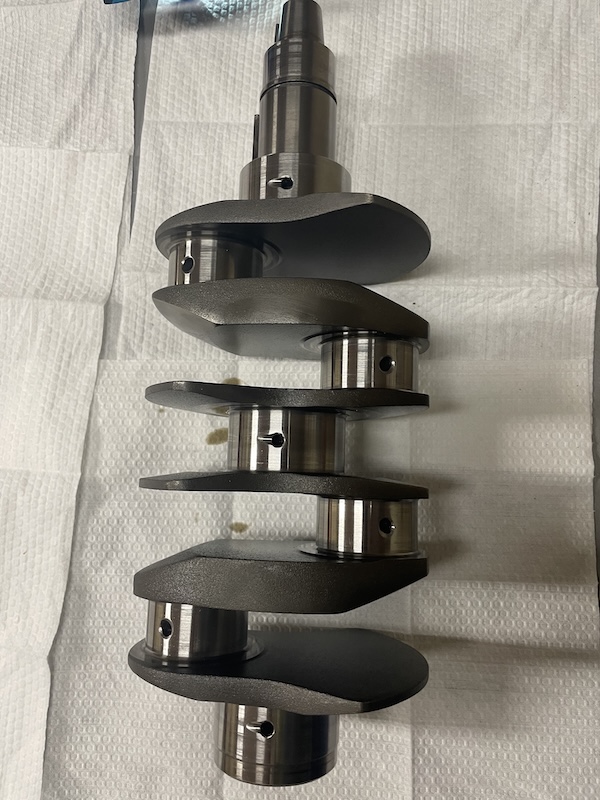 Crankcase: 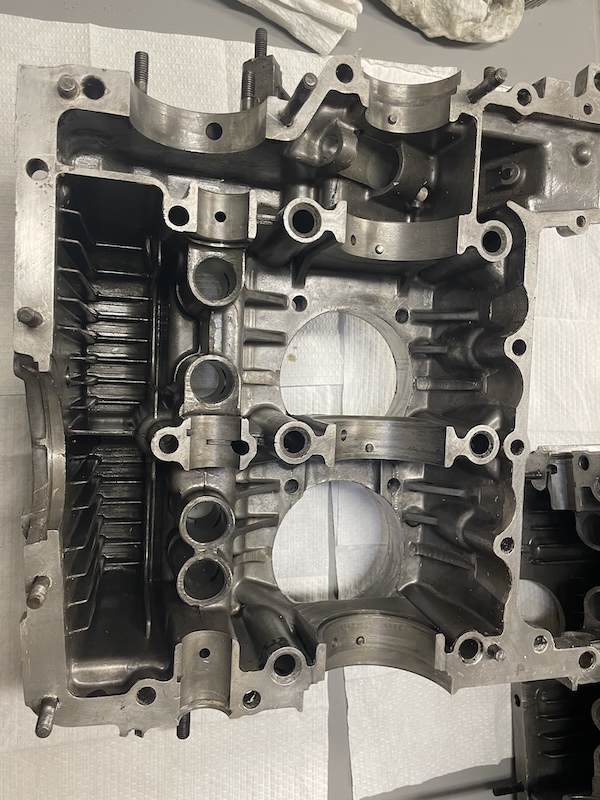 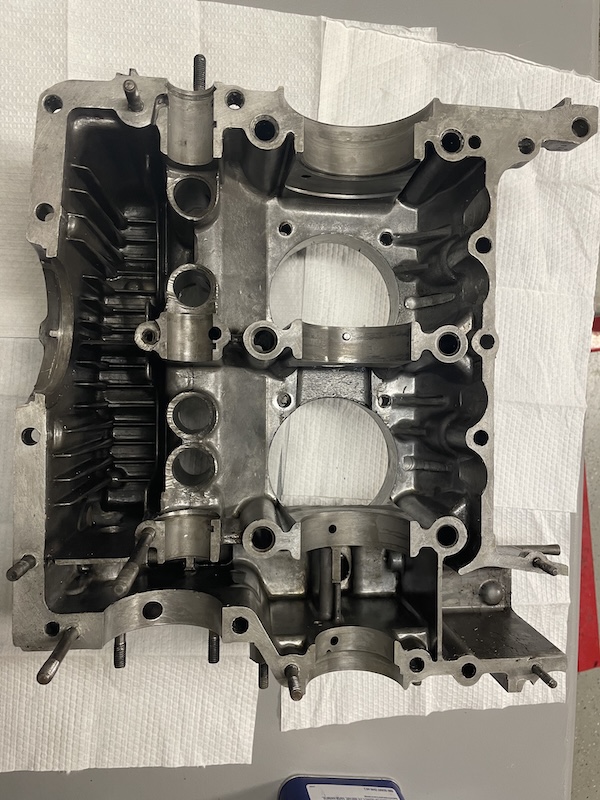 Heads: Currently cleaning the intake valves. Haven't started on the exhaust values yet. 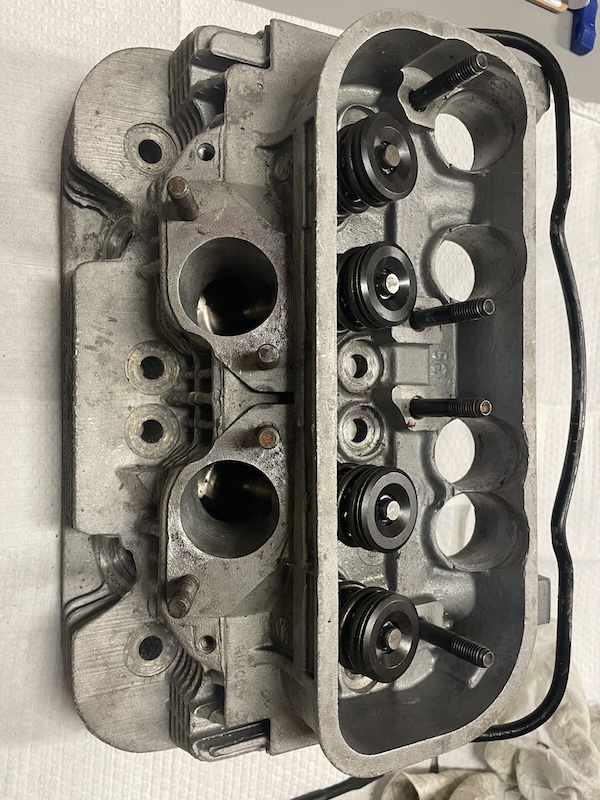 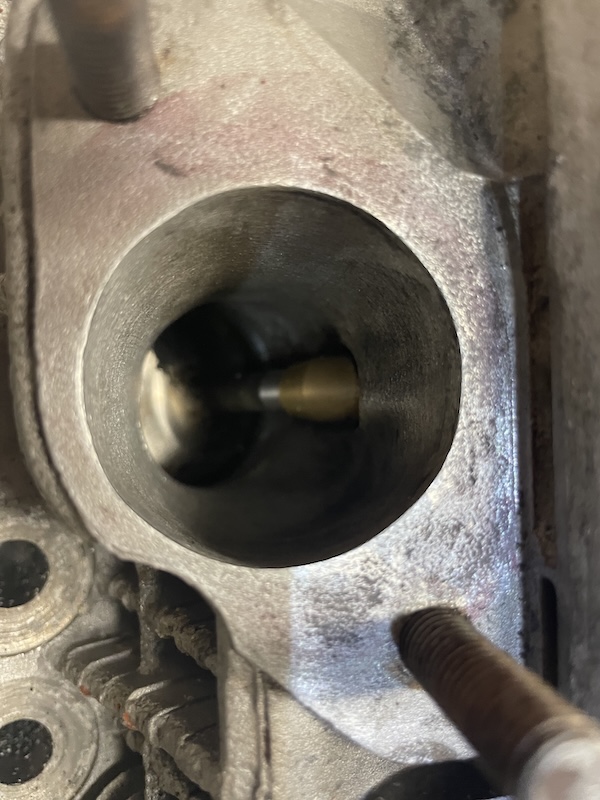 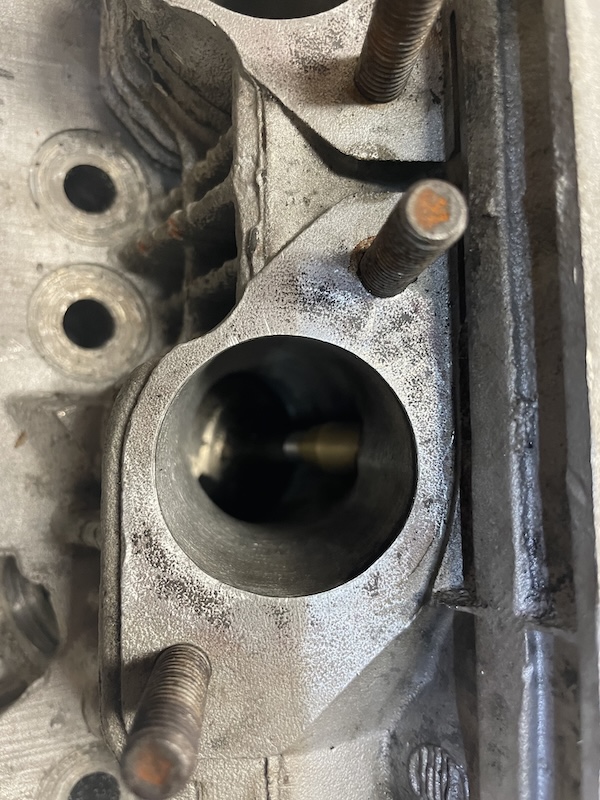 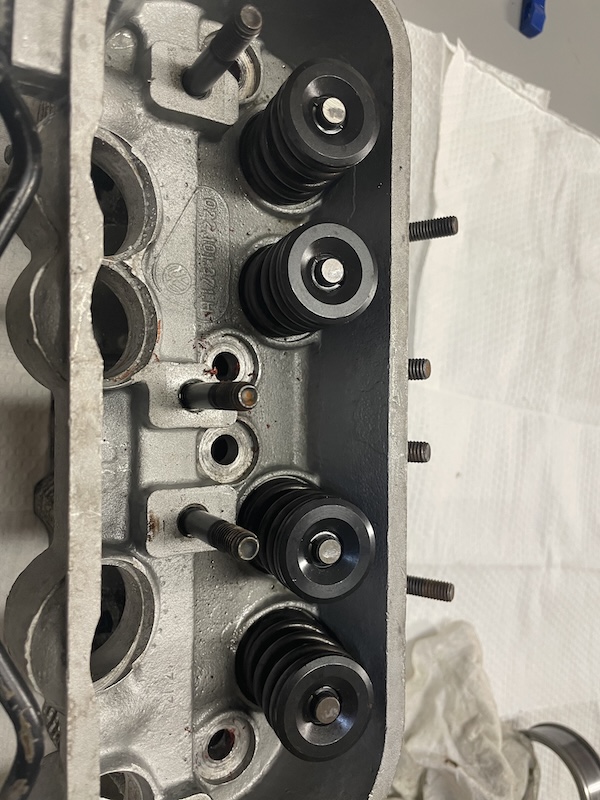 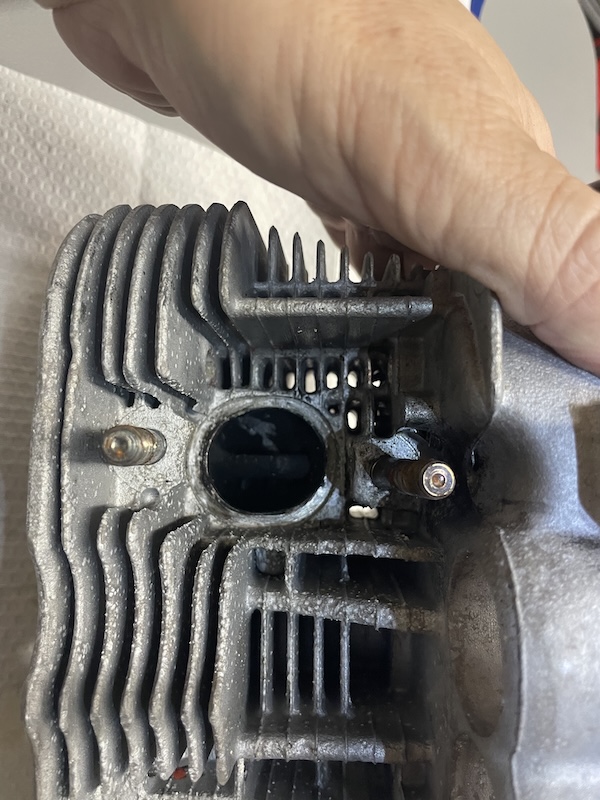 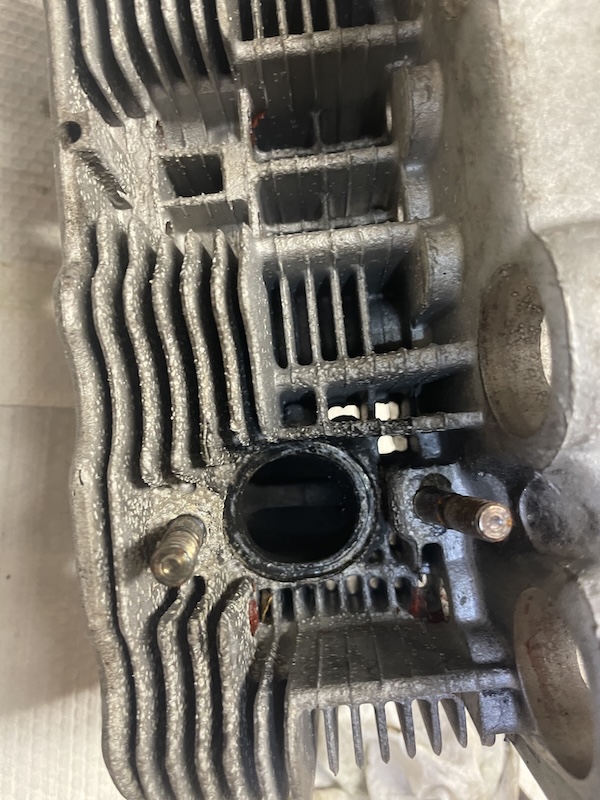 More pics coming, standby... |
|
|
|
| friethmiller |
Dec 31 2024, 07:23 PM
Post
#14
|
|
Senior Member Group: Members Posts: 1,254 Joined: 10-February 19 From: Austin, TX Member No.: 22,863 Region Association: Southwest Region |
More Pics:
Note: any perpendicular marks are from my dial bore gauge More pics of main bearings: 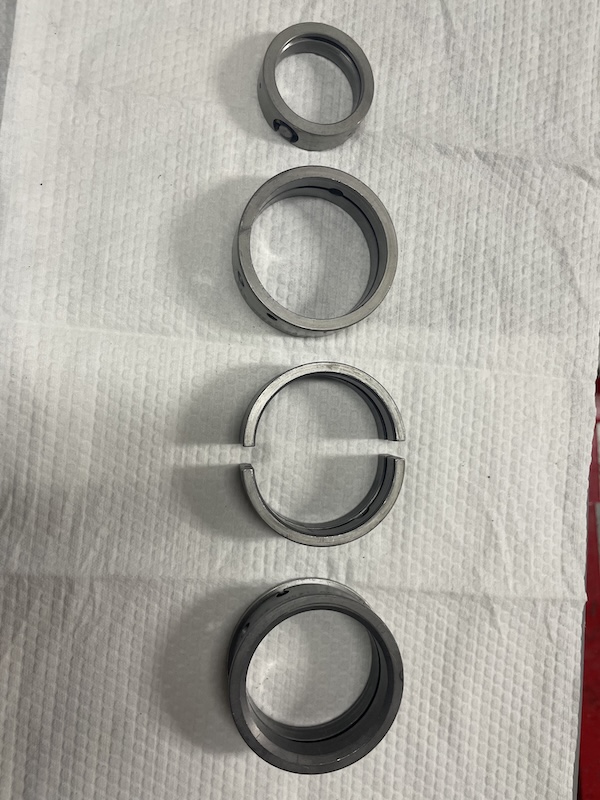 Bearing #1 (small one): 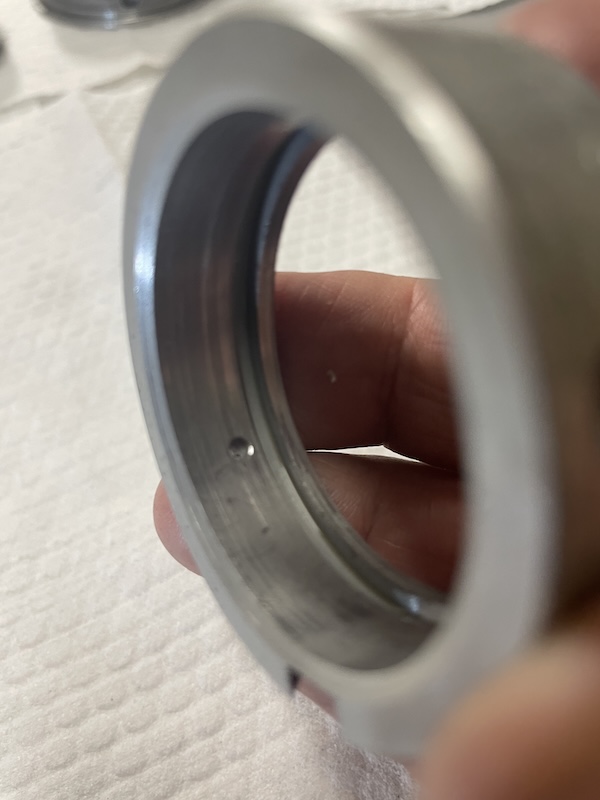 Bearing #2: 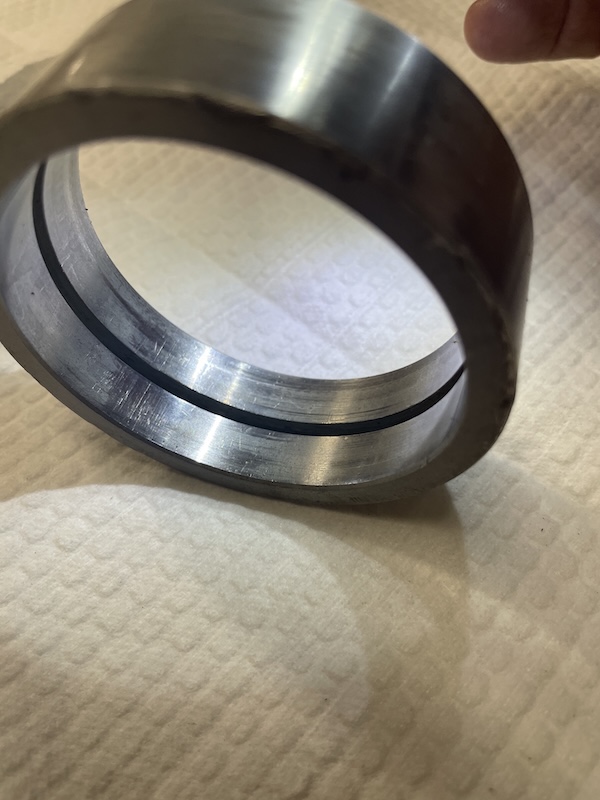 Bearing #3: See previous images of split bearing. Bearing #4 (Rear main): 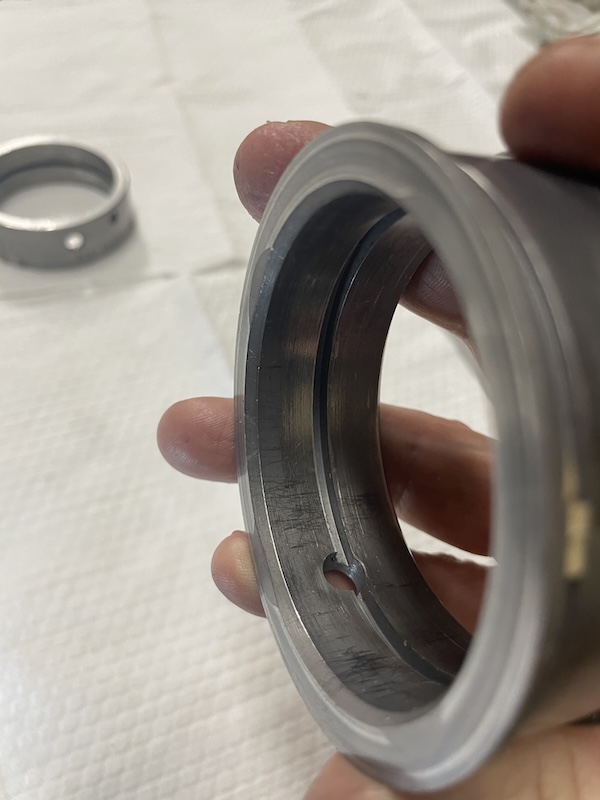 Heads (cylinder side): 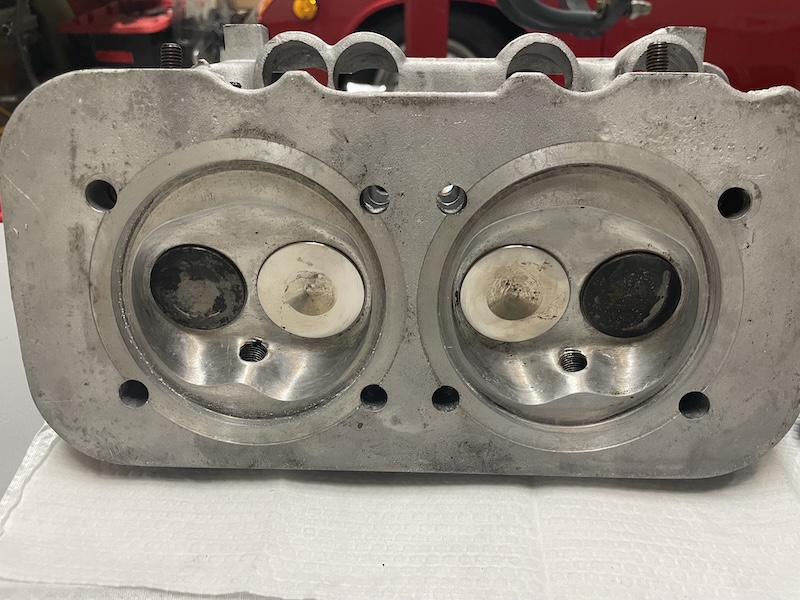 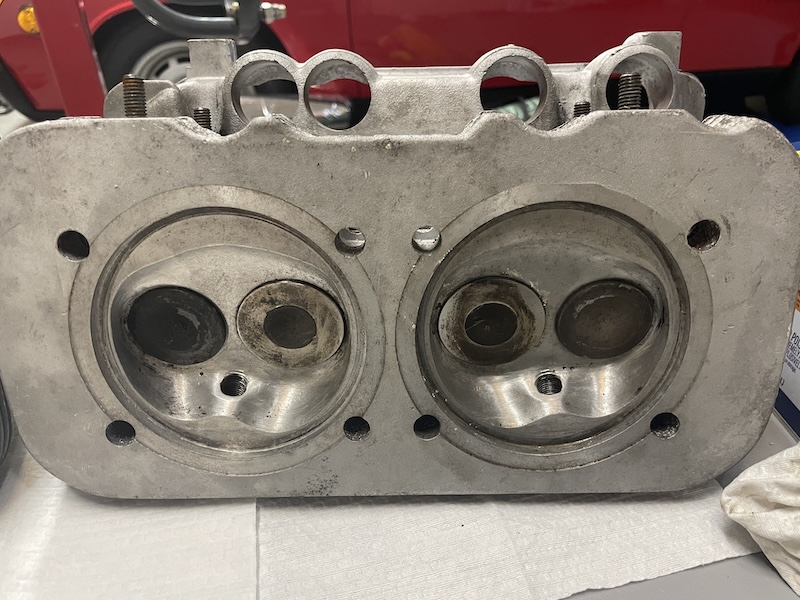 Crankcase (outside): 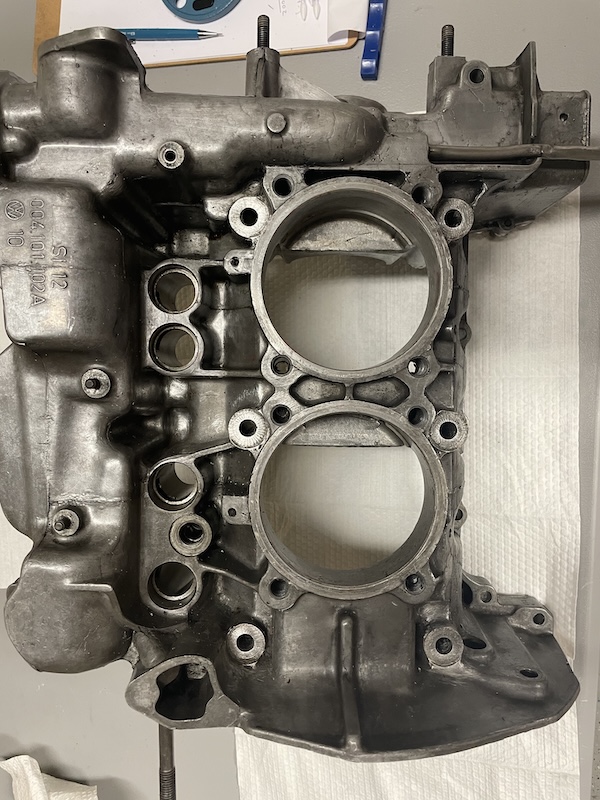 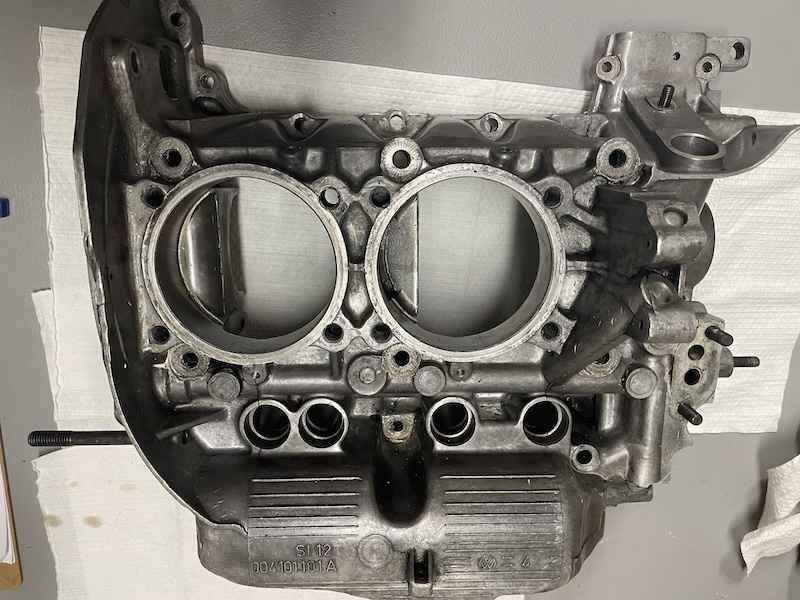 Cylinders: Rust spots from me leaving them in the ultra-sonic cleaner (IMG:style_emoticons/default/sad.gif) 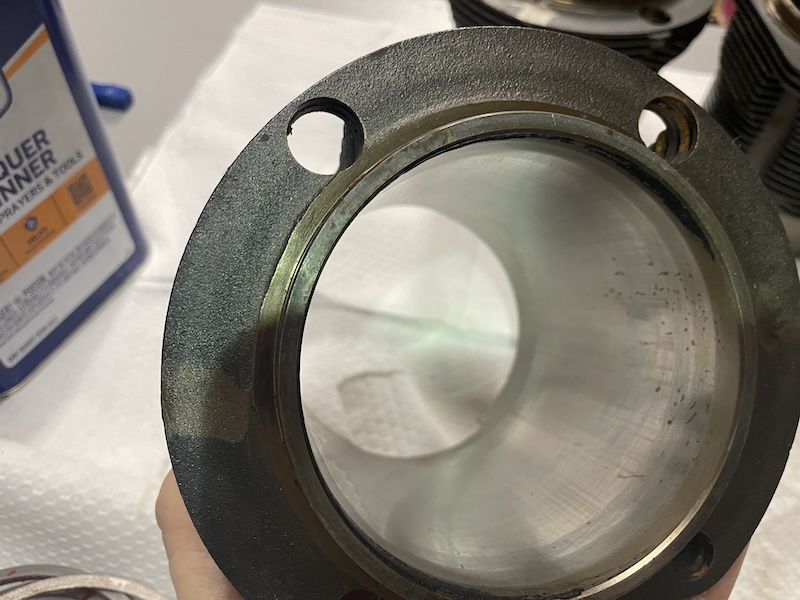 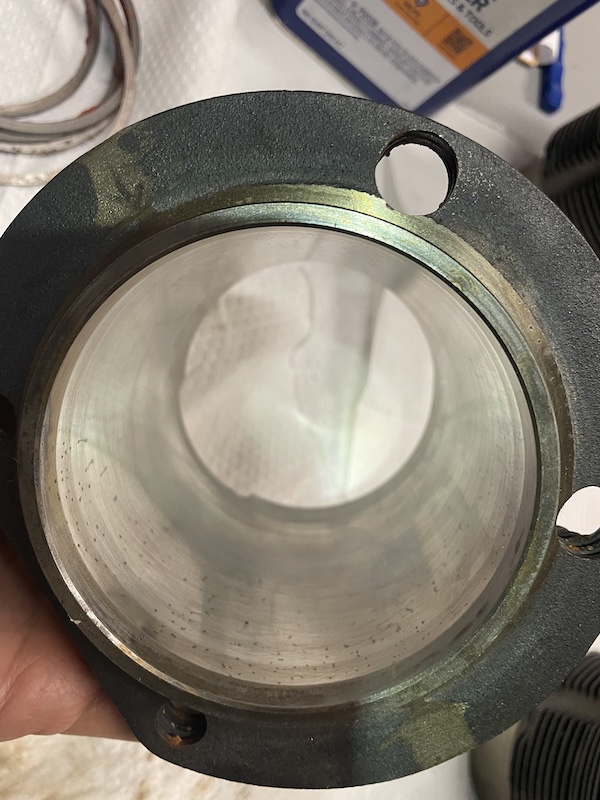 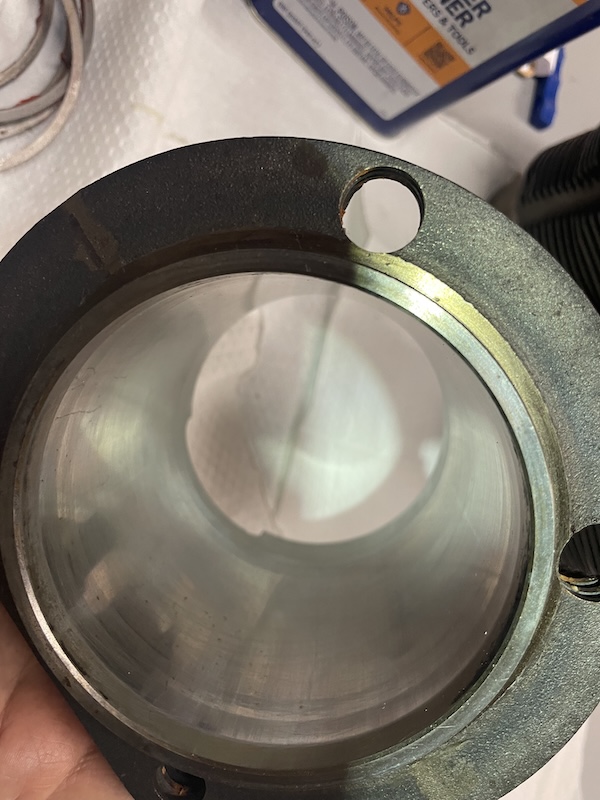 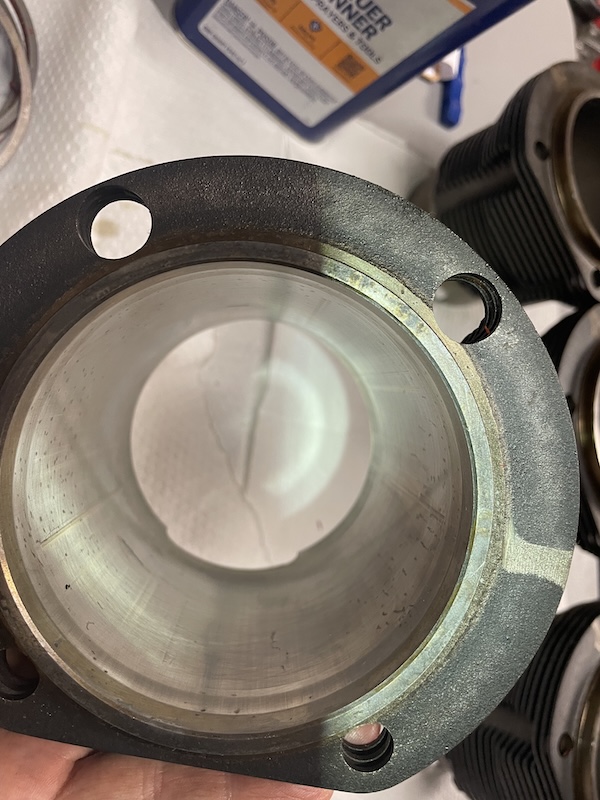 Cylinder Spacers (used per cylinder): 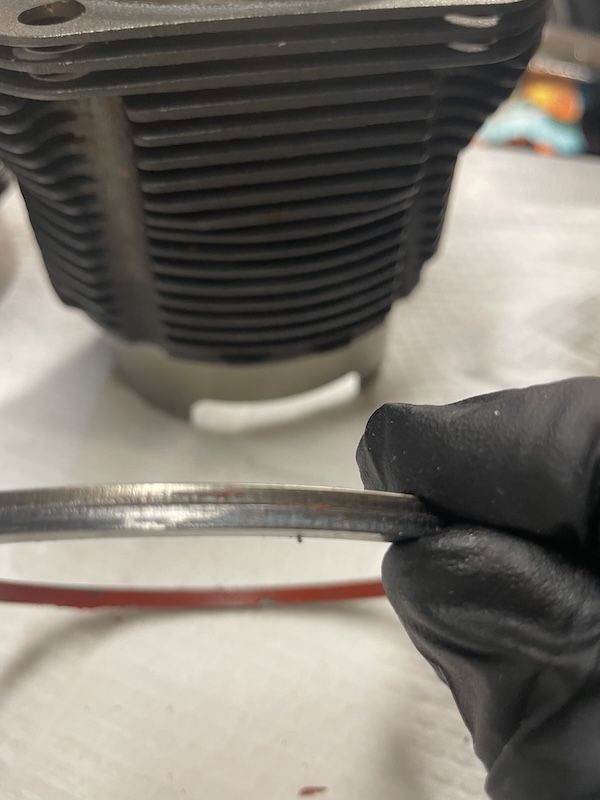 Ridge of Carbon found on all cylinder bores (cleaning in-process): 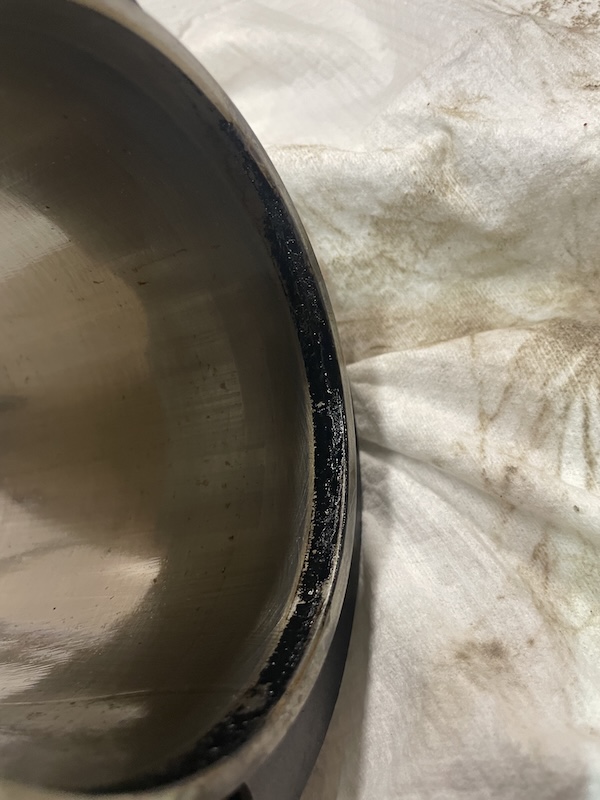 |
|
|
|
| friethmiller |
Dec 31 2024, 07:51 PM
Post
#15
|
|
Senior Member Group: Members Posts: 1,254 Joined: 10-February 19 From: Austin, TX Member No.: 22,863 Region Association: Southwest Region |
Crankshaft Journal Measurements:
Note: main journals previously ground 0.10 and rod journals ground 0.20 Mains: #1 - 1.5657” #2 - 2.3547” #3 - 2.3552” #4 - 2.3550” Rods: #2 - 1.9495” #4 - 1.9493” #1 - 1.9493” #3 - 1.9494” @technicalninja - haven't started blueprinting anything yet. |
|
|
|
| technicalninja |
Jan 1 2025, 10:28 AM
Post
#16
|
|
Advanced Member Group: Members Posts: 2,531 Joined: 31-January 23 From: Granbury Texas Member No.: 27,135 Region Association: Southwest Region |
Reality check...
I never said anything because it was not my place, you seemed very enthusiastic and a super nice guy... Your engine SUCKED DONKEY BALLS! If you remember the point at which I was driving the car... Did I ever say, "Oh this is bad-assed"! I remember thinking "NFW I'd have spent big bucks on this level of performance". It "felt" like maybe 130hp, 100 at the wheels... I was NOT impressed! The cam, the build quality, the tuning was way off! Makes sense now. Thanks for the pictures! You're NOT going to like what I see... If this is a 6k mile motor, you got screwed. Your bearings look a SHITLOAD worse than the bearings I pulled out of a "dead" core 2.0L I bought from 914sixer. Your cam shit is trashed. The cam bearings show mis-alignment too! The level of deposits on the head and piston crown looks BOTH too rich/un-tuned AND bad oil consumption... Bores don't look great either. That critter WOULD get the line bore checked/done. Registers milled. Crank micro polished (minimum) or turned. The most forward (towards belt) rod journal on the crank looks like it might require machine work. I didn't notice any evidence of balancing on that crank (weird small drill marks that don't look factory.) These look like someone was starting a hole. It's normal to have more than one and the holes are almost always at differing depths. The last one usually just barely marks the surface. Don't see of that at all! The flywheel is "juicier" than it should be at 6K. Leaking from flywheel bolts (you can see the streaks). No "Raby" RMS mods. This is "low hanging fruit' and should be done on ANY rebuild, even cheap ass ones, as it costs nothing... If you want, you're welcome to bring that stuff up to my shop and I'll do a HARSH inspection while you're looking on. I'd have had those valves out of the heads early... And the saddest point of all... I can assess customers freaking fast! In just a few minutes I can tell if the customer is price sensitive and how much trouble I'm going to have with them. This comes from 40 years of dealing with differing levels of customers. You're NOT a cheapskate! After properly explaining why I'd EXPECT you to take the "more correct route" over the "more economical route" (there are ALWAYS at least two ways to skin the cat). You have money too! Maybe not shitloads but more than enough to properly build a T4. And you got taken advantage of... Ninja sad, sympathetic with customer... (IMG:style_emoticons/default/ninja.gif) |
|
|
|
| friethmiller |
Jan 1 2025, 11:06 AM
Post
#17
|
|
Senior Member Group: Members Posts: 1,254 Joined: 10-February 19 From: Austin, TX Member No.: 22,863 Region Association: Southwest Region |
QUOTE(technicalninja @ Jan 1 2025, 10:28 AM) Reality check... I never said anything because it was not my place, you seemed very enthusiastic and a super nice guy... Your engine SUCKED DONKEY BALLS! If you remember the point at which I was driving the car... Did I ever say, "Oh this is bad-assed"! I remember thinking "NFW I'd have spent big bucks on this level of performance". It "felt" like maybe 130hp, 100 at the wheels... I was NOT impressed! The cam, the build quality, the tuning was way off! Makes sense now. Thanks for the pictures! You're NOT going to like what I see... If this is a 6k mile motor, you got screwed. Your bearings look a SHITLOAD worse than the bearings I pulled out of a "dead" core 2.0L I bought from 914sixer. Your cam shit is trashed. The cam bearings show mis-alignment too! The level of deposits on the head and piston crown looks BOTH too rich/un-tuned AND bad oil consumption... Bores don't look great either. That critter WOULD get the line bore checked/done. Registers milled. Crank micro polished (minimum) or turned. The most forward (towards belt) rod journal on the crank looks like it might require machine work. I didn't notice any evidence of balancing on that crank (weird small drill marks that don't look factory.) These look like someone was starting a hole. It's normal to have more than one and the holes are almost always at differing depths. The last one usually just barely marks the surface. Don't see of that at all! The flywheel is "juicier" than it should be at 6K. Leaking from flywheel bolts (you can see the streaks). No "Raby" RMS mods. This is "low hanging fruit' and should be done on ANY rebuild, even cheap ass ones, as it costs nothing... If you want, you're welcome to bring that stuff up to my shop and I'll do a HARSH inspection while you're looking on. I'd have had those valves out of the heads early... And the saddest point of all... I can assess customers freaking fast! In just a few minutes I can tell if the customer is price sensitive and how much trouble I'm going to have with them. This comes from 40 years of dealing with differing levels of customers. You're NOT a cheapskate! After properly explaining why I'd EXPECT you to take the "more correct route" over the "more economical route" (there are ALWAYS at least two ways to skin the cat). You have money too! Maybe not shitloads but more than enough to properly build a T4. And you got taken advantage of... Ninja sad, sympathetic with customer... (IMG:style_emoticons/default/ninja.gif) (IMG:style_emoticons/default/agree.gif) I appreciate your honesty, Rick! I don't need my sh1t sugar-coated. I was never happy with the performance of this build. either. Question is, what's the path forward? There's not a lot of bearing options with a crank that is already -.10 on the mains and -.20 on the rod journals, I don't think. Perhaps a new crank (at whatever size) that will take STD bearings, new cam setup (lifters/pushrods), and new 96mm jugs. (IMG:style_emoticons/default/idea.gif) Regardless, the case is going to a trusted shop that will inspect/machine, if necessary. Just need to find that place. |
|
|
|
| technicalninja |
Jan 1 2025, 11:08 AM
Post
#18
|
|
Advanced Member Group: Members Posts: 2,531 Joined: 31-January 23 From: Granbury Texas Member No.: 27,135 Region Association: Southwest Region |
Are the pistons true flat tops with no valve depressions?
I actually prefer that style but on a monster like that I'd have expected valve cuts (little half circles) to be mandatory. Depending on the cam choice you MAY have to add them. True flat tops can be MUCH more critical regarding valve clearance. Claying and checking clearance is a REQUIREMENT! I'd measure cam base circle NOW as well. Avoid any of the lobe with a dial caliper. You'll be under an inch now. If I had your motor, I'd stay T4 on my 75... |
|
|
|
| friethmiller |
Jan 1 2025, 11:19 AM
Post
#19
|
|
Senior Member Group: Members Posts: 1,254 Joined: 10-February 19 From: Austin, TX Member No.: 22,863 Region Association: Southwest Region |
QUOTE(technicalninja @ Jan 1 2025, 11:08 AM) Are the pistons true flat tops with no valve depressions? I actually prefer that style but on a monster like that I'd have expected valve cuts (little half circles) to be mandatory. Depending on the cam choice you MAY have to add them. True flat tops can be MUCH more critical regarding valve clearance. Claying and checking clearance is a REQUIREMENT! I'd measure cam base circle NOW as well. Avoid any of the lobe with a dial caliper. You'll be under an inch now. If I had your motor, I'd stay T4 on my 75... They're flat-top pistons. I'll see about measuring cam circle. 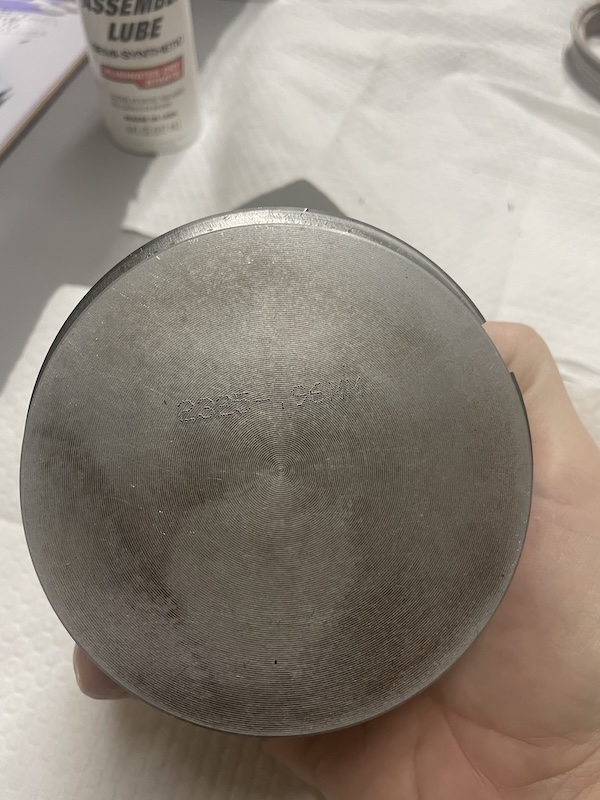 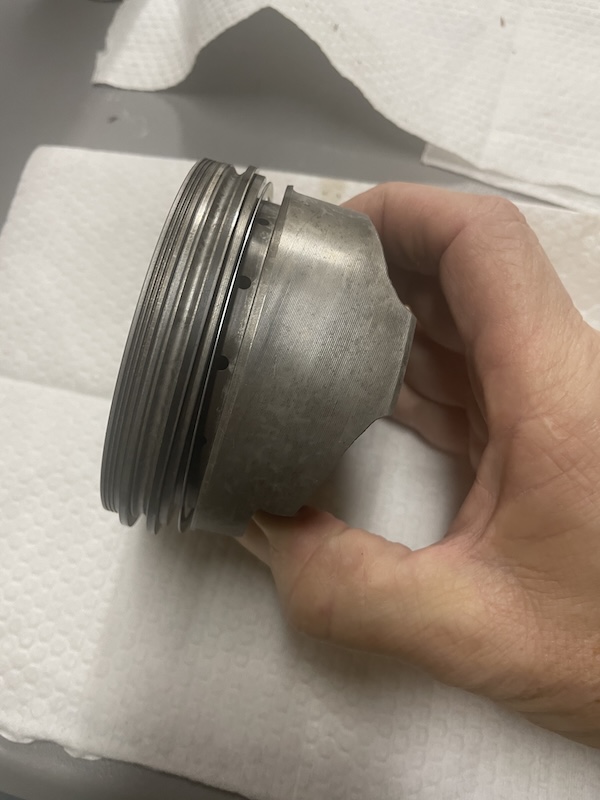 |
|
|
|
| technicalninja |
Jan 1 2025, 11:28 AM
Post
#20
|
|
Advanced Member Group: Members Posts: 2,531 Joined: 31-January 23 From: Granbury Texas Member No.: 27,135 Region Association: Southwest Region |
I MAY have a close machine shop.
Replacing everything is NOT the answer! Here, I'm going to be cheaper than you! New rings from JE, have jugs platue honed at the proper finish for the JE rings as long as P-W clearance is ok (forged can take a bunch of clearance before failure). Crank micro-polished (maybe) and balanced. I would guess the case needs line boring from the weird bearing wear. I'd ceramic coat the piston crowns/combustion chambers/exhaust port/exhaust valve (both sides) and face of the intake valve. I'd do this myself and not send then out. A "sacrificial" oven will be involved with this process. Search Craigslist. T4 heads will fit fine in what's available. I'm hunting a BIG oven as I want to the able to do Datsun 6s too and they don't fit in anything... But I wouldn't do anything until I had decided on a cam profile and verified Piston to Valve clearance first. It IS possible to have a forged piston machined for valve pockets. Now, everything regarding the cam drive needs to be NEW! I'd probably try and re-use the rest of what you have now. Running all of this by the guys at LN would be one of my first steps! In a PM conversation with another member, he came up with "Just sending his stuff to LN." which has merit. |
|
|
|
|
1 User(s) are reading this topic (1 Guests and 0 Anonymous Users)
0 Members:

|
Lo-Fi Version | Time is now: 12th May 2026 - 07:07 PM |
Invision Power Board
v9.1.4 © 2026 IPS, Inc.