|
|
|
Porsche, and the Porsche crest are registered trademarks of Dr. Ing. h.c. F. Porsche AG.
This site is not affiliated with Porsche in any way. Its only purpose is to provide an online forum for car enthusiasts. All other trademarks are property of their respective owners. |
|
|

  |

| Chad911sc |
 Apr 25 2025, 05:50 PM Apr 25 2025, 05:50 PM
Post
#1
|
|
Member  Group: Members Posts: 68 Joined: 24-September 24 From: Florida Member No.: 28,374 Region Association: South East States |
So after 5 long months of work, I finally have the 2056 built and installed. (IMG:style_emoticons/default/piratenanner.gif)
I have a couple questions about the 123 4RV distributor. I haven’t hooked it up to power yet, but from my understanding, you hook up only the red wire and then power the ignition and a light should come on in the body of the distributor. 1) Since our motors go in a CW direction, the first movement of the distributor goes clockwise until the light turns off? Then CCW until the green light comes on? Correct? 2) The engine has dual carb Webber 40’s/Web cam 86a/Mild port and polished stock valve heads. My question is what setting should I use on the distributor? From what I see it looks like curve #3. Does this sound right? 3) Do I use the vacuum port on the distributor body to the base of one of my carbs, or do I plug it off, or do I leave it open? Thanks in advance for any info! Attached thumbnail(s) 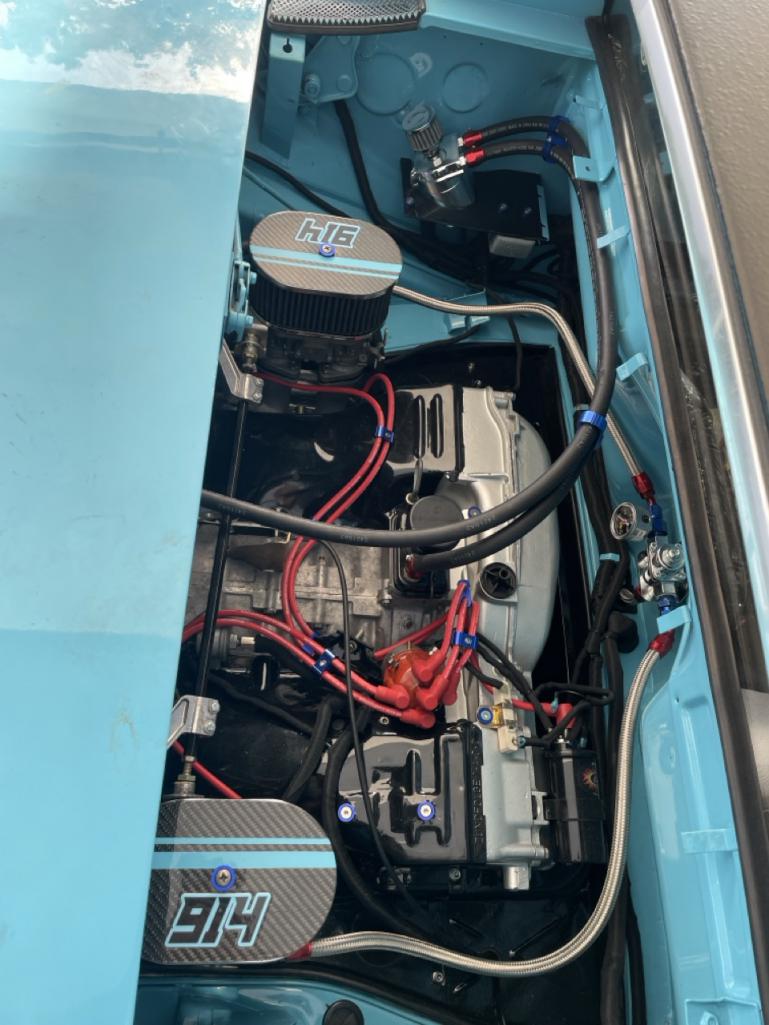 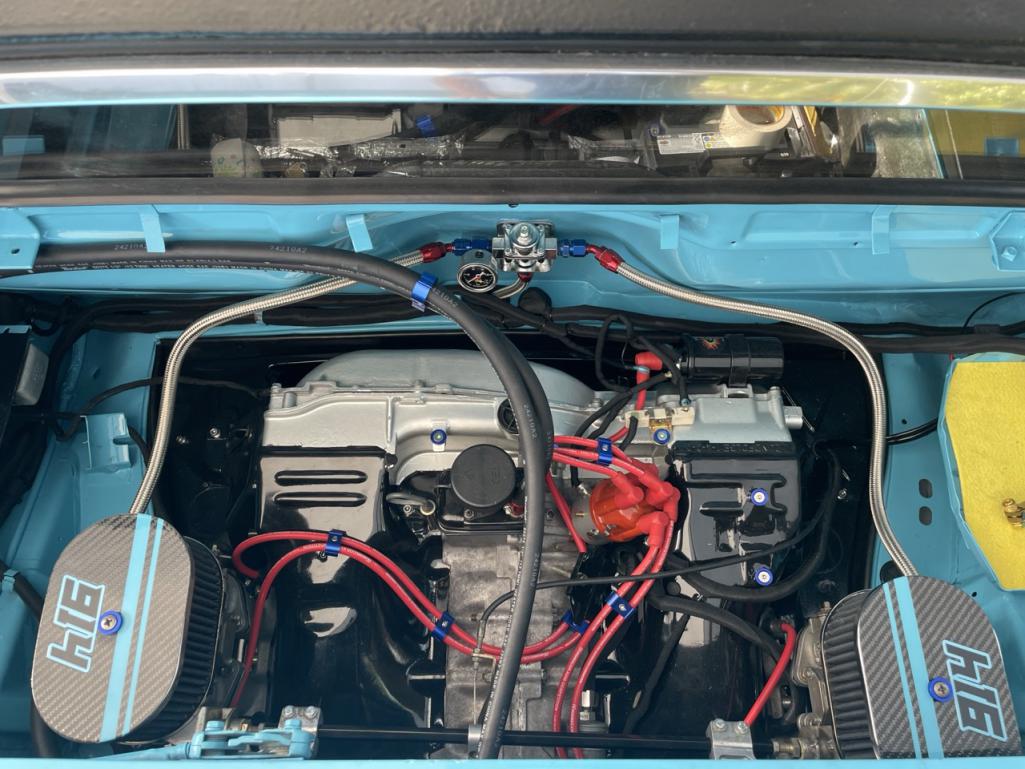 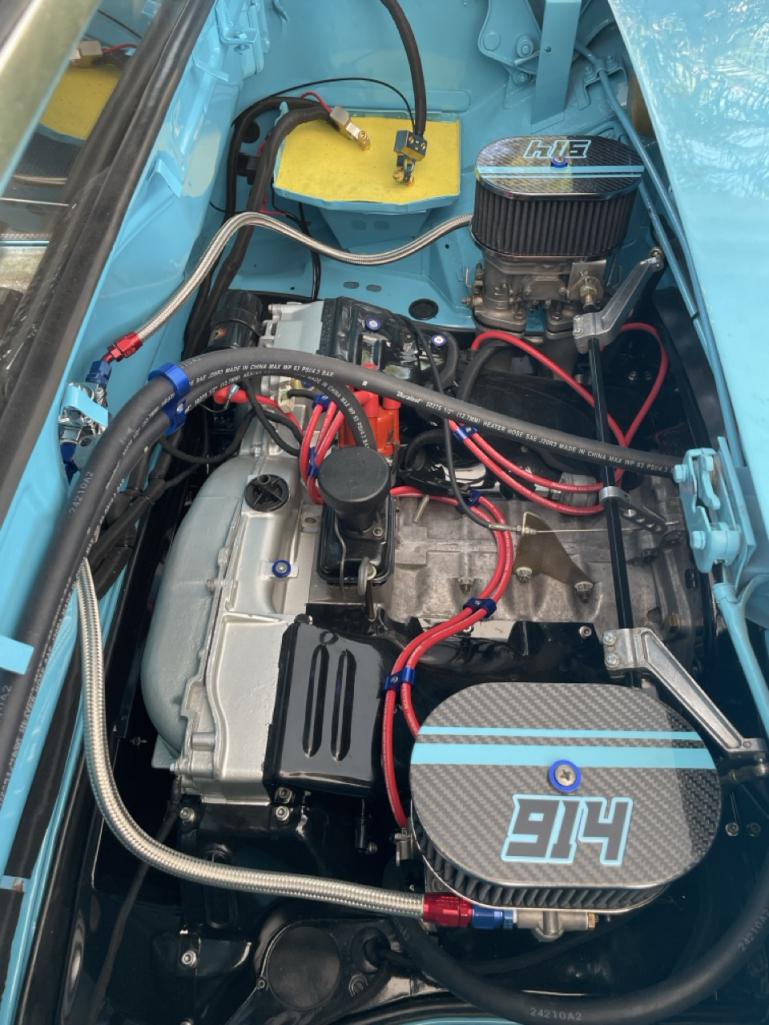 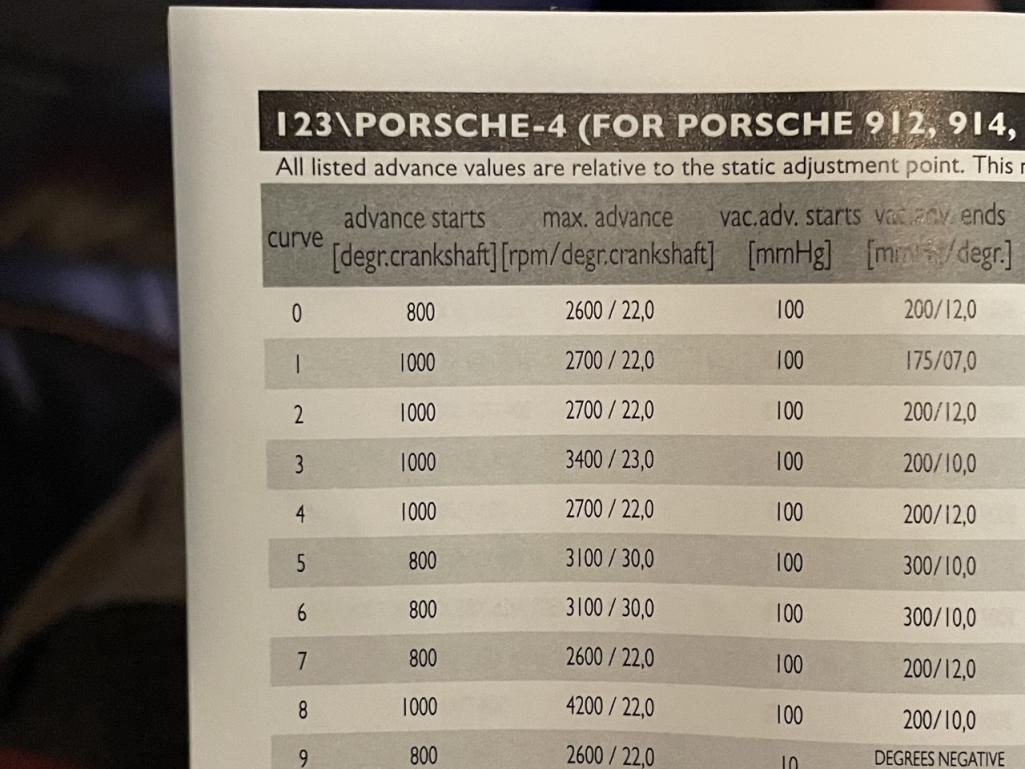
|
   |

 
|
| Front yard mechanic |
Apr 25 2025, 07:03 PM
Post
#2
|
|
Senior Member Group: Members Posts: 1,317 Joined: 23-July 15 From: New Mexico Member No.: 18,984 Region Association: None |
I was told to use 5 seems to run great
|
|
|
|
| Cairo94507 |
Apr 26 2025, 06:30 AM
Post
#3
|
|
Michael Group: Members Posts: 10,304 Joined: 1-November 08 From: Auburn, CA Member No.: 9,712 Region Association: Northern California |
Wow! That looks amazing. (IMG:style_emoticons/default/beerchug.gif)
|
|
|
|
| Chad911sc |
Apr 27 2025, 06:42 AM
Post
#4
|
|
Member Group: Members Posts: 68 Joined: 24-September 24 From: Florida Member No.: 28,374 Region Association: South East States |
Thanks for the replies fellas!
Hadn’t even looked at setting #5, but it is relatively close to setting #3 that I was thinking. Just want to make sure it’s close, so when I fire it up for the first time I can run it without problems for 20 mins to break in the cam. Once I get it all back together I’ll post pics of the rest of the car….I like carbon fiber (IMG:style_emoticons/default/biggrin.gif) |
|
|
|
| moto914 |
Apr 27 2025, 07:44 AM
Post
#5
|
|
Member Group: Members Posts: 58 Joined: 27-February 17 From: Greenville SC Member No.: 20,878 Region Association: South East States |
Looks like a lot of good work.
|
|
|
|
| sb914 |
Apr 27 2025, 08:19 AM
Post
#6
|
|
Surf Guru Group: Members Posts: 4,485 Joined: 25-November 12 From: Brookings,Oregon Member No.: 15,191 Region Association: Southern California |
Very tidy looking.
|
|
|
|
| technicalninja |
Apr 27 2025, 08:54 AM
Post
#7
|
|
Advanced Member Group: Members Posts: 2,531 Joined: 31-January 23 From: Granbury Texas Member No.: 27,135 Region Association: Southwest Region |
Curve 3 looks fine for an initial setting to me.
You shouldn't be "overtimed" to start with. Where is there a difference between #5 and #6? Those have 7-8 degrees more mechanical. They look like what a "normal" water pumper would want. It is odd that the other curves besides 3 have either 22 or 30 degrees mechanical. Your engine compartment is closing on "World Class" (IMG:style_emoticons/default/first.gif) I especially like the CF air filter hats with color matched "bling" I'd bet you're looking for the plastic washers in a lighter hue of blue... Might be able to paint to match! Nicely done Sir! |
|
|
|
| emerygt350 |
Apr 27 2025, 09:49 AM
Post
#8
|
|
Advanced Member Group: Members Posts: 2,855 Joined: 20-July 21 From: Upstate, NY Member No.: 25,740 Region Association: North East States |
QUOTE(technicalninja @ Apr 27 2025, 08:54 AM)  Curve 3 looks fine for an initial setting to me. You shouldn't be "overtimed" to start with. Where is there a difference between #5 and #6? Those have 7-8 degrees more mechanical. They look like what a "normal" water pumper would want. It is odd that the other curves besides 3 have either 22 or 30 degrees mechanical. Your engine compartment is closing on "World Class" (IMG:style_emoticons/default/first.gif) I especially like the CF air filter hats with color matched "bling" I'd bet you're looking for the plastic washers in a lighter hue of blue... Might be able to paint to match! Nicely done Sir! That looks really good. I don't have carbs but I use 0 and 1. If my base timing is at 8-9 that gets me around 30-31 all in. I see there is quite a difference in the 0vs1 vacuum advance, I might play with that a little bit when I get back to the states. Interested in how that affects cruise mpg and heat. If you are running 5 and a base timing of 7 that puts you pretty far advanced but I have had my engine up near 40 before and it ran fine. Just didn't want to chance detonation. |
|
|
|
| emerygt350 |
Apr 27 2025, 09:49 AM
Post
#9
|
|
Advanced Member Group: Members Posts: 2,855 Joined: 20-July 21 From: Upstate, NY Member No.: 25,740 Region Association: North East States |
dupe
|
|
|
|
| Chad911sc |
Apr 27 2025, 07:48 PM
Post
#10
|
|
Member Group: Members Posts: 68 Joined: 24-September 24 From: Florida Member No.: 28,374 Region Association: South East States |
Yeah 3 is what I read on a couple other sites as well. I think I will start with three and fine tune it later once I have the initial can break in period.
Thanks for the compliments! I like things to look tidy a proper, and being a professional painter for years, it’s just in my blood now…lol. And yes I need lighter blue screw sets for the carb tops (IMG:style_emoticons/default/biggrin.gif) |
|
|
|
| Chad911sc |
Apr 27 2025, 07:52 PM
Post
#11
|
|
Member Group: Members Posts: 68 Joined: 24-September 24 From: Florida Member No.: 28,374 Region Association: South East States |
Oh yeah…and is there any thought on the vacuum advance? Should I run that to a carb base, or just plug it off?? So many opinions on that and I’m not the best when it comes to the timing issues and the necessity of the vacuum advance.
|
|
|
|
| emerygt350 |
Apr 28 2025, 04:35 AM
Post
#12
|
|
Advanced Member Group: Members Posts: 2,855 Joined: 20-July 21 From: Upstate, NY Member No.: 25,740 Region Association: North East States |
I have run it with and without. Many with the 123 just don't run it at all. Just make sure it is ported vacuum.
|
|
|
|
| emerygt350 |
Apr 28 2025, 04:37 AM
Post
#13
|
|
Advanced Member Group: Members Posts: 2,855 Joined: 20-July 21 From: Upstate, NY Member No.: 25,740 Region Association: North East States |
And is that a ballast resistor near the coil?
|
|
|
|
| Shivers |
Apr 28 2025, 05:59 AM
Post
#14
|
|
Senior Member Group: Members Posts: 2,967 Joined: 19-October 20 From: La Quinta, CA Member No.: 24,781 Region Association: Southern California |
Nice job, that’s a beauty!
|
|
|
|
| Spoke |
Apr 28 2025, 12:28 PM
Post
#15
|
|
Jerry Group: Members Posts: 7,156 Joined: 29-October 04 From: Allentown, PA Member No.: 3,031 Region Association: None |
Looks fantastic.
|
|
|
|
| technicalninja |
Apr 28 2025, 12:44 PM
Post
#16
|
|
Advanced Member Group: Members Posts: 2,531 Joined: 31-January 23 From: Granbury Texas Member No.: 27,135 Region Association: Southwest Region |
Vacuum advance is helpful for street. Will improve acceleration from high vacuum conditions (cruise at 2500rpm).
It's added complexity for a track focused car that is never at "cruise". I'd use the vacuum advance, but I'd make a little plenum and run at least two (opposite in firing order) intake sources. All 4 are better. The problem with ITB set ups is each tube only sees a single vacuum pulse for each 720 degrees of revolution. At low speed its "choppy". Try without, then hook up a single hose(easy), and if you see improvements look into the MAP plenum I mentioned. Use a manifold vacuum source. Full vacuum at idle. Avoid ported vacuum (none at closed throttle, increases as throttle opens) for a performance application. Ported vacuum (and vacuum retards) are IMPORTANT for early emissions reasons/equipment. |
|
|
|
| friethmiller |
Apr 28 2025, 01:54 PM
Post
#17
|
|
Senior Member Group: Members Posts: 857 Joined: 10-February 19 From: Austin, TX Member No.: 22,863 Region Association: Southwest Region |
Your engine bay is the "Tits!" Nicely done, sir! (IMG:style_emoticons/default/first.gif)
|
|
|
|
| emerygt350 |
Apr 28 2025, 02:50 PM
Post
#18
|
|
Advanced Member Group: Members Posts: 2,855 Joined: 20-July 21 From: Upstate, NY Member No.: 25,740 Region Association: North East States |
If you plug your advance into the manifold it will be "on" all the time, shutting off only when you drop below 5 or so inhg. Not good. It is only meant for cruise conditions. The 123 is on or off as far as advance goes. It turns it on if it sees just a tiny amount of vacuum on that hose. It is either ported or not at all. Unless you like 10 degrees of advance all the time.
|
|
|
|
| Chad911sc |
Apr 28 2025, 09:33 PM
Post
#19
|
|
Member Group: Members Posts: 68 Joined: 24-September 24 From: Florida Member No.: 28,374 Region Association: South East States |
Ok….im just going to plug it off for now and once I get it on the road, if it’s not acting right I will mess with the vacuum port.
As far as a ballast, if you are referring to the white bar that is by the coil, yes. This is how it was when I bought it, so I hooked it up exactly like it was. If this is not correct, please advise on what to do to remove it. I’m not the best with the electrical paths that are present on these cars and what is best once switched to carbs. Thanks again for all the compliments and advice. My strengths are making things look good, not necessarily with motors and electrical paths. Kudos to all the help I had with building this engine, it took forever because I built it twice….lol. |
|
|
|
|
1 User(s) are reading this topic (1 Guests and 0 Anonymous Users)
0 Members:

|
Lo-Fi Version | Time is now: 29th April 2025 - 03:50 AM |
Invision Power Board
v9.1.4 © 2025 IPS, Inc.