|
|
|
Porsche, and the Porsche crest are registered trademarks of Dr. Ing. h.c. F. Porsche AG.
This site is not affiliated with Porsche in any way. Its only purpose is to provide an online forum for car enthusiasts. All other trademarks are property of their respective owners. |
|
|

  |

| roundtwo |
 Jun 23 2026, 04:48 PM Jun 23 2026, 04:48 PM
Post
#1
|
|
Member  Group: Members Posts: 363 Joined: 9-February 20 From: Petaluma, CA Member No.: 23,905 Region Association: Central California |
Have a 1971 that I purchased a few years back from the original owner. He upgraded it to a 2 L some time back.
Fortunately, I have a 2 L that I bought from a customer at Eason Auto Works who was upgrading to a six in his 914. It had all the documentation from the rebuild and only about 35K on it. Fast-forward to now and I’m transplanting that engine into the 1971. See pictures. Pic 1. Replacement engine with sensor. Pic 2. Original engine with oil pressure Pic 3. Original engine sending unit (?) Original engine in picture number one and number two. Oil pressure sensor next to the distributor. The replacement engine I have only has an engine temperature sensor? in the same spot. Car has a oil pressure gauge Do I need remove the engine tin to swap out the base of the oil pressure fitting? I’m not sure what I’ll find under there. I would like a working gauge, but I’ve read on some of the forums that having an oil pressure sensor leak rapidly can be catastrophic if it fails Appreciate some advice about this. .  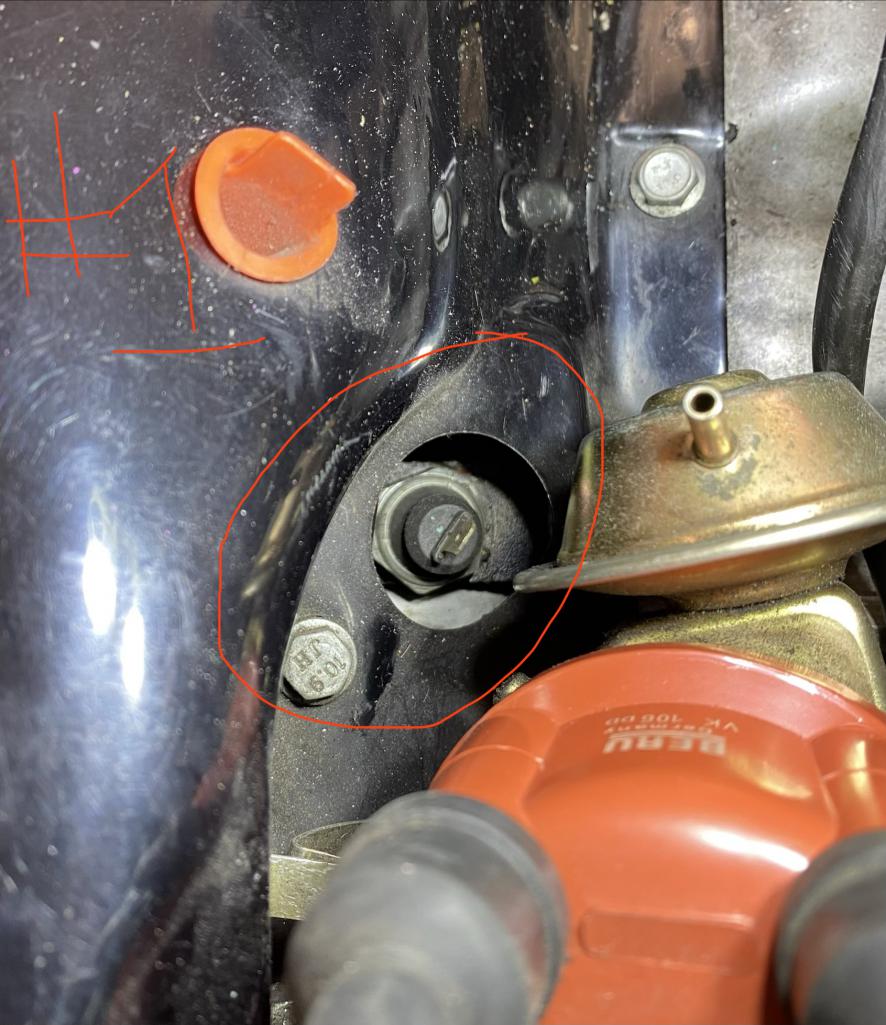  |
   |

 
|
| roundtwo |
Jun 23 2026, 04:49 PM
Post
#2
|
|
Member Group: Members Posts: 363 Joined: 9-February 20 From: Petaluma, CA Member No.: 23,905 Region Association: Central California |
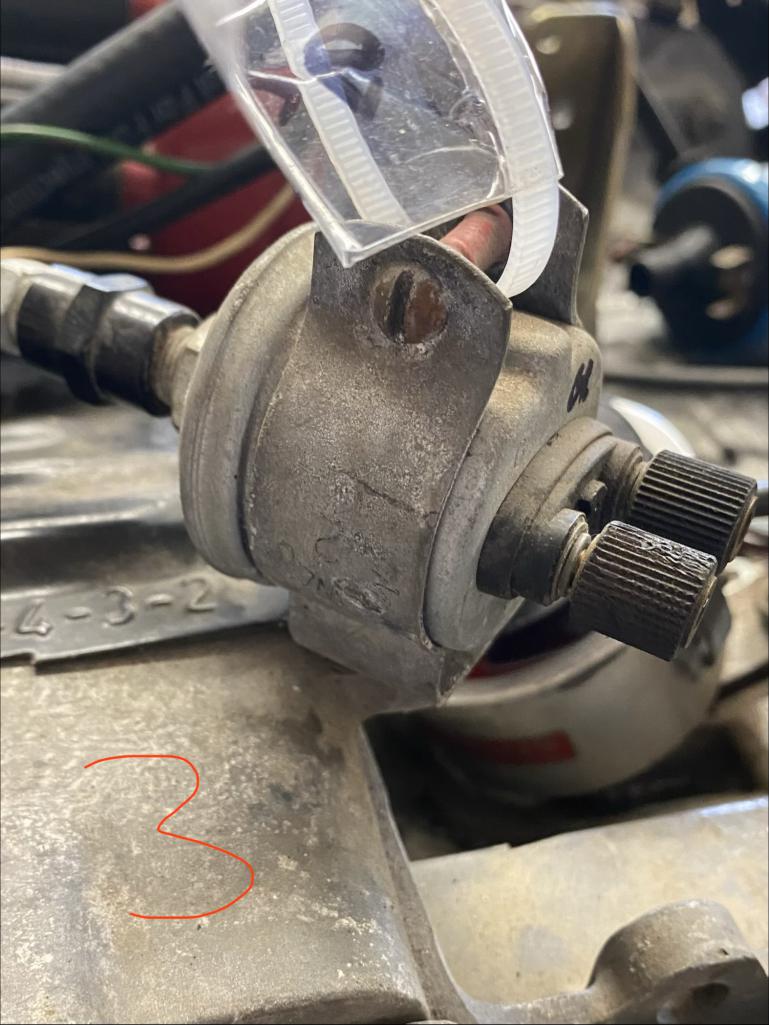
Pic 3
 Engine surgery room 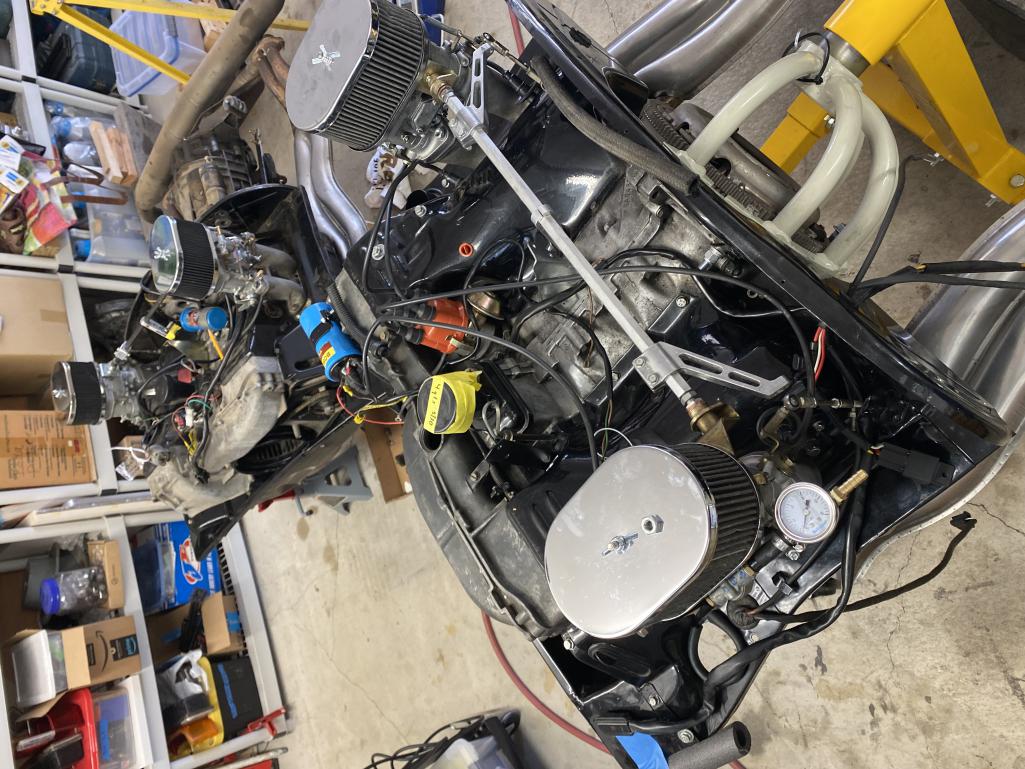 |
|
|
|
| 930cabman |
Jun 23 2026, 06:42 PM
Post
#3
|
|
Advanced Member Group: Members Posts: 4,723 Joined: 12-November 20 From: Buffalo Member No.: 24,877 Region Association: North East States |
I simply insert a T fitting on a short hose (as shown), one side to the case, one to the factory idiot light and the other to a copper line into the cockpit for an actual gauge
|
 |
|
| Montreal914 |
Jun 23 2026, 08:58 PM
Post
#4
|
|
Advanced Member Group: Members Posts: 2,149 Joined: 8-August 10 From: Claremont, CA Member No.: 12,023 Region Association: Southern California |
Your picture #3 shows the oil pressure sender. This model has two connection points, one is for the pressure gauge and the other is for the pressure light if I recall. That being said, I am not sure if the trigger for the pressure light is set at the same pressure as the stock one you show in picture 2.
Important, the ouside shell of the pressure sender (picture 3) needs to be connected to ground. Notice the metal clamp around it, make sure it is fastened to make ground. That's all I have, other will chime in. Good luck! (IMG:style_emoticons/default/smile.gif) |
|
|
|
| Jack Standz |
Jun 23 2026, 09:51 PM
Post
#5
|
|
Senior Member Group: Members Posts: 860 Joined: 15-November 19 From: Happy Place (& surrounding area) Member No.: 23,644 Region Association: None |
For an oil pressure gauge and an oil pressure light, you need the pressure line (a Porcshe 928 brake line works) shown in pic2 and a double pole sender as shown in pic3. Yes, you need to make sure the sender housing is connected to a good ground.
You can use one of these to install the hose (get a set with the right sizes of sockets): https://www.amazon.com/Orion-Motor-Tech-Inj...C425&sr=8-7 Attached image(s) 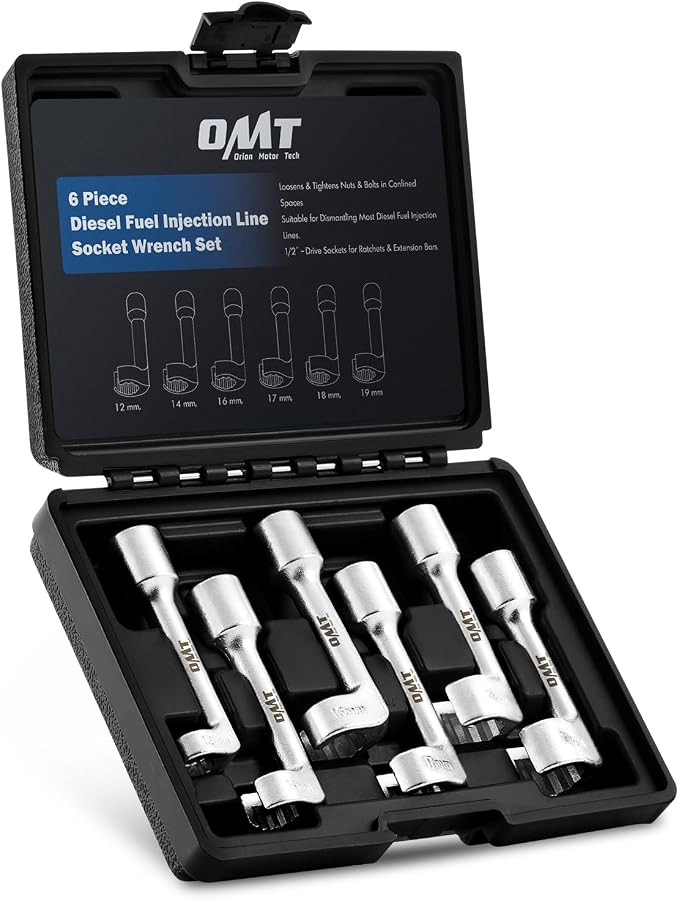
|
|
|
|
| bdstone914 |
Jun 24 2026, 07:22 AM
Post
#6
|
|
bdstone914 Group: Members Posts: 5,324 Joined: 8-November 03 From: Riverside CA Member No.: 1,319 |
@930cabman
' date='Jun 23 2026, 05:42 PM' post='3262518'] I simply insert a T fitting on a short hose (as shown), one side to the case, one to the factory idiot light and the other to a copper line into the cockpit for an actual gauge [/quote] Bad idea. The shaking on the overhung weight of the sender can snap the fitting at the threads. I have seen it happen. Flexible hose with sender remotely mounting is the way to do it. |
|
|
|
| 930cabman |
Jun 24 2026, 07:57 AM
Post
#7
|
|
Advanced Member Group: Members Posts: 4,723 Joined: 12-November 20 From: Buffalo Member No.: 24,877 Region Association: North East States |
[quote name='bdstone914' date='Jun 24 2026, 07:22 AM' post='3262600']
@930cabman ' date='Jun 23 2026, 05:42 PM' post='3262518'] I simply insert a T fitting on a short hose (as shown), one side to the case, one to the factory idiot light and the other to a copper line into the cockpit for an actual gauge [/quote] Bad idea. The shaking on the overhung weight of the sender can snap the fitting at the threads. I have seen it happen. Flexible hose with sender remotely mounting is the way to do it. [/quote] Thought thats what I said? (short hose) Adding a rigid extension can vibrate and cause issues |
|
|
|
| roundtwo |
Jun 24 2026, 08:55 AM
Post
#8
|
|
Member Group: Members Posts: 363 Joined: 9-February 20 From: Petaluma, CA Member No.: 23,905 Region Association: Central California |
@930cabman
@montreal914 @Jack Standz @bdstone914 Thanks for all the info. Confirmed 1. I understand in picture 3 the sender is hooked up to a ground and a green and pink wire. Got that covered and wires in place- one from the firewall location and the other from the engine harness. 2. Extrapolating from the various responses, I can remove the pressure line in pic 2 (paired with the sender in pic 3), remove the sensor in pic 1 and swap them from the manifolds/ fittings where they are located. I can use the handy dandy far reaching, 90 degree angle wrenches for this OR REMOVE THE TIN TO ACCESS the fittings (PLEASE CONFIRM THIS and that they have the same size compatible threads to match each/ either manifold FYI the oil pressure gauge in the car is electronic (obviously). No I don't want to run a pressurized oil line to the instrument panel. That's so Triumph TR6 @Jack Standz ...I couldn't get the system to accept your name with the response. Is there a space (spacebar) between Jack and Stanz or...? |
|
|
|
| BillC |
Jun 24 2026, 09:03 AM
Post
#9
|
|
Senior Member Group: Members Posts: 737 Joined: 24-April 15 From: Silver Spring, MD Member No.: 18,667 Region Association: MidAtlantic Region |
QUOTE(roundtwo @ Jun 24 2026, 10:55 AM)  @Jack Standz ...I couldn't get the system to accept your name with the response. Is there a space (spacebar) between Jack and Stanz or...? For names containing spaces, you need to put quotes around the name. For instance: @ " Jack Standz ". @Jack Standz |
|
|
|
| roundtwo |
Jun 24 2026, 10:05 AM
Post
#10
|
|
Member Group: Members Posts: 363 Joined: 9-February 20 From: Petaluma, CA Member No.: 23,905 Region Association: Central California |
@ " Jack Standz " Ohhhhh! Thanks. Do you know if I am correct with the remove and replace strategy? |
|
|
|
| Jack Standz |
Jun 24 2026, 11:46 AM
Post
#11
|
|
Senior Member Group: Members Posts: 860 Joined: 15-November 19 From: Happy Place (& surrounding area) Member No.: 23,644 Region Association: None |
QUOTE(roundtwo @ Jun 24 2026, 09:55 PM) @930cabman @montreal914 @Jack Standz @bdstone914 Thanks for all the info. Confirmed 1. I understand in picture 3 the sender is hooked up to a ground and a green and pink wire. Got that covered and wires in place- one from the firewall location and the other from the engine harness. 2. Extrapolating from the various responses, I can remove the pressure line in pic 2 (paired with the sender in pic 3), remove the sensor in pic 1 and swap them from the manifolds/ fittings where they are located. I can use the handy dandy far reaching, 90 degree angle wrenches for this OR REMOVE THE TIN TO ACCESS the fittings (PLEASE CONFIRM THIS and that they have the same size compatible threads to match each/ either manifold FYI the oil pressure gauge in the car is electronic (obviously). No I don't want to run a pressurized oil line to the instrument panel. That's so Triumph TR6 @Jack Standz ...I couldn't get the system to accept your name with the response. Is there a space (spacebar) between Jack and Stanz or...? Actually, pic3 shows the double pole sender, but it's just laying there and it looks like it's not grounded to anything. If it is mounted/bolted to the motor when you're finished and the motor is grounded well, then OK. Don't recommend removing the tin to add the hose and sender. Why add difficulty to the process and add potential issues like intake leaks if/when you remove/reinstall them to remove the tin (or you drop the screws that hold the tin on into an inaccessible place, etc.)? $23 for a set of diesel line wrenches is a small price to pay to avoid the potential aggravation. Maybe at least try a regular socket first on the single pole sender and maybe you can sneak an open end wrench on that hose, although the difficulty factor increases with that Mallory Unilite distributor in the way. |
|
|
|
| Montreal914 |
Jun 24 2026, 12:03 PM
Post
#12
|
|
Advanced Member Group: Members Posts: 2,149 Joined: 8-August 10 From: Claremont, CA Member No.: 12,023 Region Association: Southern California |
Is picture 3 your current setup?
If so, what is wrong with it? As long as that clamp is bolted to a grounded surface, you are good to go! (IMG:style_emoticons/default/driving.gif) That was my setup for many years. |
|
|
|
| 914sgofast2 |
Jun 24 2026, 01:45 PM
Post
#13
|
|
Senior Member Group: Members Posts: 804 Joined: 10-May 13 From: El Dorado Hills, CA Member No.: 15,855 Region Association: None |
To directly answer your question, your proposed removal and replacement strategy is correct. The sender from your original engine is just the sender for the idiot oil pressure warning light. The oil pressure sender on the 2 Liter engine is the typical method for using an actual electronic oil pressure gauge. No need for any "T" fittings to be added.
As others have stated, just make sure that 2 liter engine's oil pressure sending unit is grounded to the engine for everything to work. Of the 2 wire connections on that sending unit, one is for the oil pressure warning idiot light and the other connection is for the oil pressure gauge itself. |
|
|
|
| roundtwo |
Jun 24 2026, 03:15 PM
Post
#14
|
|
Member Group: Members Posts: 363 Joined: 9-February 20 From: Petaluma, CA Member No.: 23,905 Region Association: Central California |
@914sgofast2 Got it with the wiring. thanks.
@montreal914 from you, "Is picture 3 your current setup? If so, what is wrong with it?" As in my intro, that is being transplanted to the new engine from the existing engine. That's why I'm asking all these questions. Yes, it did function and was wired correctly and well grounded to the engine. @Jack Standz Agreed to avoid the tin removal if possible. Can lead to more troubles. I'm not sure the angle wrench will fit to remove the sender in the existing engine and that I can remove the existing sensor in the "new" engine. Checking today. I was wondering about that distro...a Mallory Unilite! Thanks for letting me know as I had no idea who made it. It needs a new cap but I doubt that's available these days thanks everyone @930cabman |
|
|
|
| roundtwo |
Jun 24 2026, 03:28 PM
Post
#15
|
|
Member Group: Members Posts: 363 Joined: 9-February 20 From: Petaluma, CA Member No.: 23,905 Region Association: Central California |
QUOTE(Jack Standz @ Jun 23 2026, 08:51 PM) For an oil pressure gauge and an oil pressure light, you need the pressure line (a Porcshe 928 brake line works) shown in pic2 and a double pole sender as shown in pic3. Yes, you need to make sure the sender housing is connected to a good ground. You can use one of these to install the hose (get a set with the right sizes of sockets): https://www.amazon.com/Orion-Motor-Tech-Inj...C425&sr=8-7 Went with this as I can have it by tomorrow but most importantly it looks like it takes up minimal horizonal space. Thanks for the tip...though my very tall and fairly large tool box is overflowing! LOL |
|
|
|
| Jack Standz |
Jun 24 2026, 03:38 PM
Post
#16
|
|
Senior Member Group: Members Posts: 860 Joined: 15-November 19 From: Happy Place (& surrounding area) Member No.: 23,644 Region Association: None |
Well, it's a Mallory, but the photo is not completely helpful. IIRC Mallory may have made points distributors for VWs/Porsches. The did make them for other motors. To confirm if its a Unilite, check to see if there's an optical sensor under that rotor. Best guess is that it is.
Yes, NLA for a long time. Caps and rotors are very hard to find. In a pinch, we have used aluminum tape to cover every other slot/shutter in a Unilite rotor from a V8 rotor. Save up for a new distributor for when you either fry the optical sensor/ignition control unit or run out of caps/rotors. So, a word of caution. Be careful to not hook up the positive and negative backwards. This will kill your Unilite. Great distributors (except for the vacuum advance Unilites), but the optical sensor/ICU are know problems. We still run one on our 2056. |
|
|
|
| Jack Standz |
Jun 24 2026, 03:52 PM
Post
#17
|
|
Senior Member Group: Members Posts: 860 Joined: 15-November 19 From: Happy Place (& surrounding area) Member No.: 23,644 Region Association: None |
QUOTE(roundtwo @ Jun 25 2026, 04:28 AM) QUOTE(Jack Standz @ Jun 23 2026, 08:51 PM) For an oil pressure gauge and an oil pressure light, you need the pressure line (a Porcshe 928 brake line works) shown in pic2 and a double pole sender as shown in pic3. Yes, you need to make sure the sender housing is connected to a good ground. You can use one of these to install the hose (get a set with the right sizes of sockets): https://www.amazon.com/Orion-Motor-Tech-Inj...C425&sr=8-7 Went with this as I can have it by tomorrow but most importantly it looks like it takes up minimal horizonal space. Thanks for the tip...though my very tall and fairly large tool box is overflowing! LOL Just be careful to get a set with the size(s) you need. Can't confirm today the size you need for that hose or sensor (may be able to get it with a deep socket though). |
|
|
|
|
4 User(s) are reading this topic (1 Guests and 0 Anonymous Users)

|
Lo-Fi Version | Time is now: 24th June 2026 - 04:32 PM |
Invision Power Board
v9.1.4 © 2026 IPS, Inc.