
 HELP! Rear Swaybar Bushing Install HELP! Rear Swaybar Bushing Install |
|
|

|
Porsche, and the Porsche crest are registered trademarks of Dr. Ing. h.c. F. Porsche AG.
This site is not affiliated with Porsche in any way. Its only purpose is to provide an online forum for car enthusiasts. All other trademarks are property of their respective owners. |
|
|
  |

| friethmiller |
 Jul 27 2026, 04:15 PM Jul 27 2026, 04:15 PM
Post
#1
|
|
Senior Member  Group: Members Posts: 1,591 Joined: 10-February 19 From: Austin, TX Member No.: 22,863 Region Association: Southwest Region 
 |
I need help here. I've just burned through 3 of these bushings trying to install them into my drop link. Every time I go to push on in, it cracks and falls apart during install. I don't understand why this is the case. Can someone tell me how to do it? I am absolutely at wits-end with these damn things. (IMG:style_emoticons/default/headbang.gif)
BTW, I just got new ones from AA this time. The 914rubber ones all failed. I'm sure it was me. Please help!! 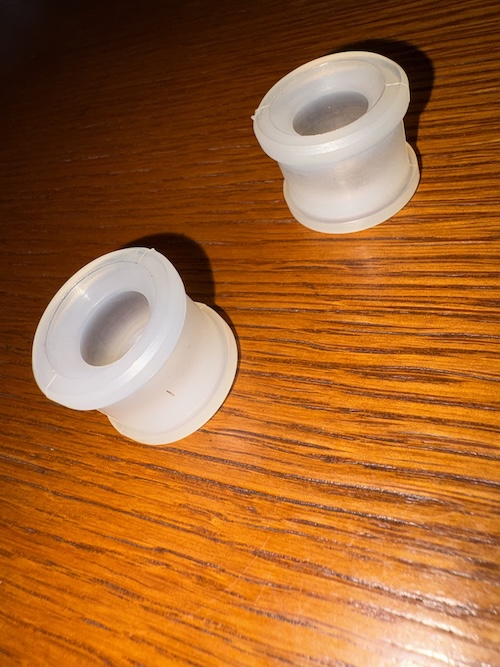 |
   |

 
|
| NARP74 |
Jul 27 2026, 04:29 PM
Post
#2
|
|
Senior Member Group: Members Posts: 1,579 Joined: 29-July 20 From: Colorado, USA, Earth Member No.: 24,549 Region Association: Rocky Mountains |
The AA ones could just be 914 Rubber ones, some parts are.
I think I put a small hole in the closed end to allow air and grease to escape and then used a clamp to slowly compress them on, going slowly and readjusting if needed. Heating them in hot water did not work for me. A heat gun while you do this might help. Too hot and they get mushy and collapse. |
|
|
|
| Ron914 |
Jul 27 2026, 04:47 PM
Post
#3
|
|
Senior Member Group: Members Posts: 562 Joined: 19-April 22 From: Huntington Beach,Ca Member No.: 26,487 Region Association: Southern California
|
I empathize with you Fred ,this has been the hardest job yet on my project .
I purchased mine from AA also and after many fails I it was suggested I buy authentic bushings from Porsche . I purchased them from Pelican and still had a problem installing them . I heard about a shop around the corner from me called Fixasix and went over to see if they could do it for me . I spent $40 but it was worth the frustration to me just to get it done . I came home excited to finally connect the rear sway bar and I must saw it still is not connected . They heated them in hot water, used silicone lubricant , a vise and a large flat blade screwdriver . I will say it took them about 30 minutes to install the bushings and it wasn't easy . It takes a lot of force to pop them onto the balls .thus I have only one end installed on the sway bar end . I used a large C clamp to accomplish that but never could get the other end attached to the shock bolts ( there is no where to use a C clamp for that side . I am thinking I might have to. remove the shock bolts and install these ends first . |
|
|
|
| friethmiller |
Jul 27 2026, 05:34 PM
Post
#4
|
|
Senior Member Group: Members Posts: 1,591 Joined: 10-February 19 From: Austin, TX Member No.: 22,863 Region Association: Southwest Region
|
My issue is with just getting the bushing into the drop link.
|
|
|
|
| Cairo94507 |
Jul 27 2026, 06:08 PM
Post
#5
|
|
Michael Group: Members Posts: 10,792 Joined: 1-November 08 From: Auburn, CA Member No.: 9,712 Region Association: Northern California
|
We stuck the bushings in very hot water to get the pliable and then squeezed them in. Greased the ball and then popped them on with a big pair of channel lock pliers. (IMG:style_emoticons/default/beerchug.gif)
|
|
|
|
| friethmiller |
Jul 27 2026, 07:25 PM
Post
#6
|
|
Senior Member Group: Members Posts: 1,591 Joined: 10-February 19 From: Austin, TX Member No.: 22,863 Region Association: Southwest Region
|
Thanks for the input! I just installed 3 without breaking them. I don’t believe it. I’ll post some pics and my technique, shortly.
|
|
|
|
| friethmiller |
Jul 27 2026, 07:28 PM
Post
#7
|
|
Senior Member Group: Members Posts: 1,591 Joined: 10-February 19 From: Austin, TX Member No.: 22,863 Region Association: Southwest Region
|
My issue is with just getting the bushing into the drop link.
|
|
|
|
| friethmiller |
Jul 27 2026, 07:40 PM
Post
#8
|
|
Senior Member Group: Members Posts: 1,591 Joined: 10-February 19 From: Austin, TX Member No.: 22,863 Region Association: Southwest Region
|
Not easy but it can be done in about 5mins each.
1) put drop link into vise and tighten 2) warm up bushing with heat gun 3) Insert bushing in a way to take advantage of the vise’s pressure 4) use blade of screw driver to push lip into hole 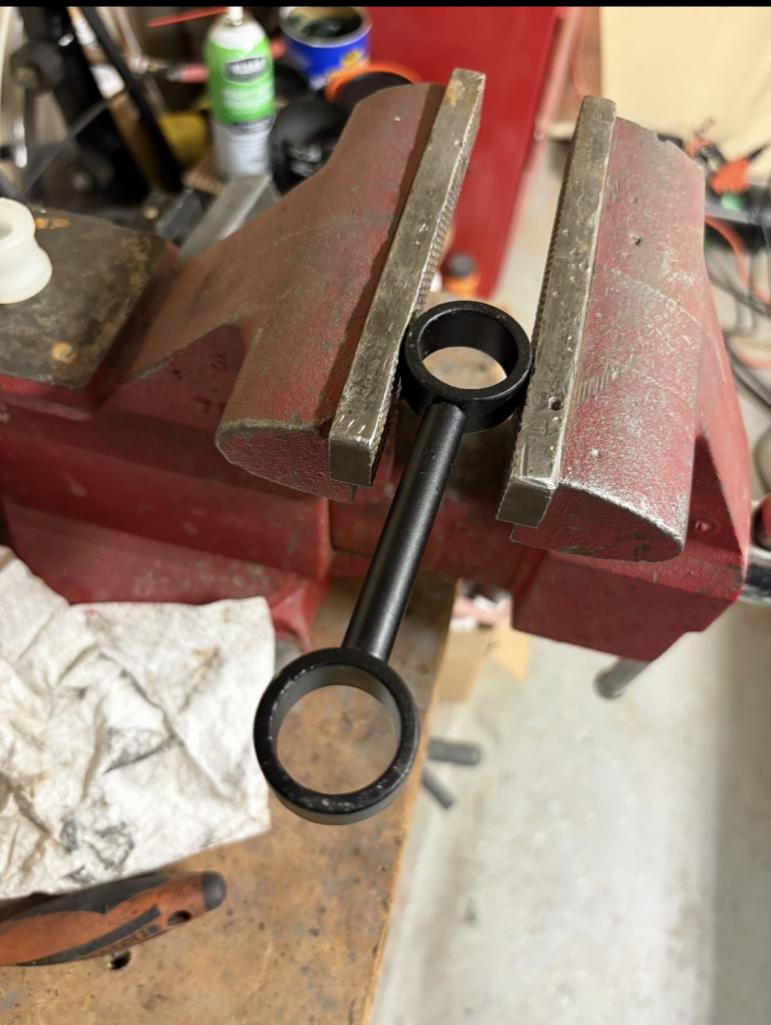 . . 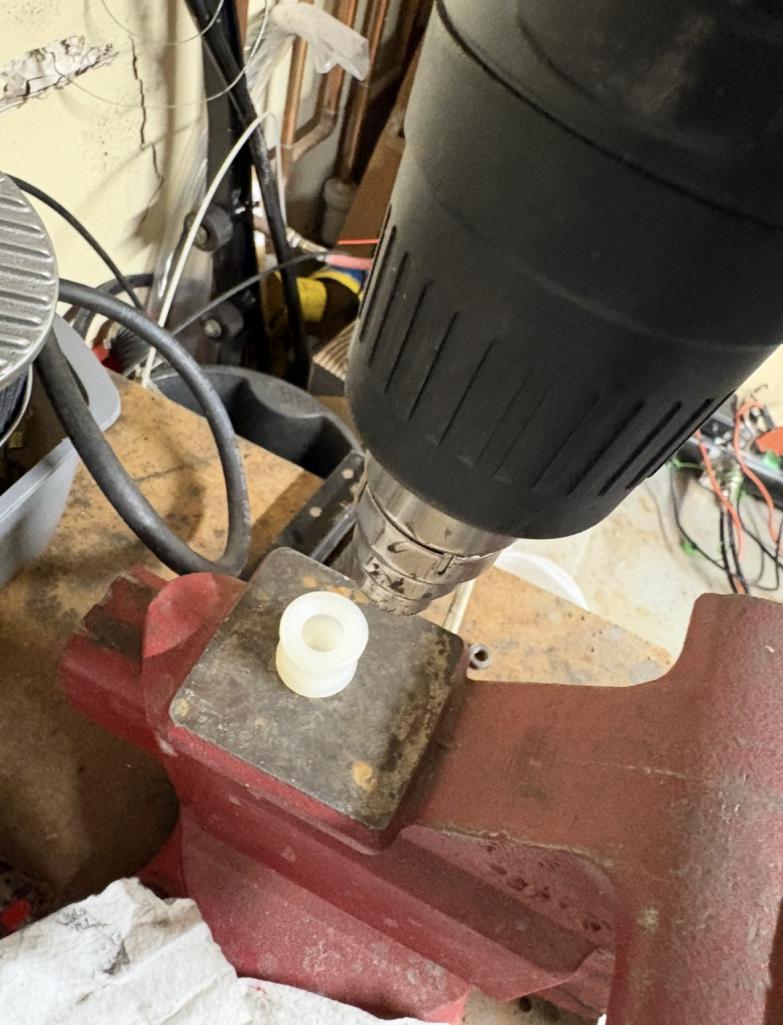 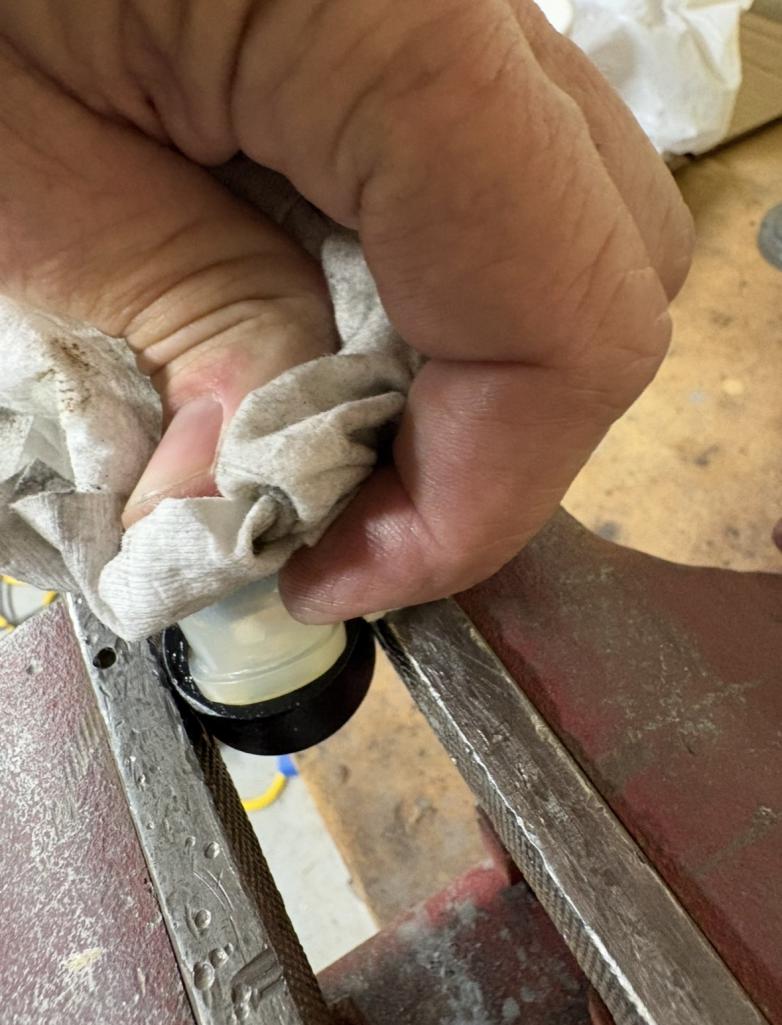 |
|
|
|
| TRP |
Jul 27 2026, 10:11 PM
Post
#9
|
|
Member Group: Members Posts: 460 Joined: 2-September 23 From: Morgan Hill, CA Member No.: 27,559 Region Association: None
|
There is a thread somewhere with the perfect solution for installing these. I was having a heck of a time with these, but followed the thread and found success. Let me see if I can find it.
Okay, found it: http://www.914world.com/bbs2/index.php?showtopic=354046 Start with the open side of the bushing into the endlink first. I boiling water first and some glycerin on the bushing and end link. Starting with open end works in your favor because it will compress a bit more than the solid end. Ted |
|
|
|
| 914werke |
Jul 28 2026, 06:44 AM
Post
#10
|
|
"I got blisters on me fingers" Group: Members Posts: 11,772 Joined: 22-March 03 From: USofA Member No.: 453 Region Association: Pacific Northwest
|
Fred do a search on 914werke & "sway bar links" (or some variation) you should find a post where I detail the hot water process + a simple tool I made in 5 mins that made my production of links effortless.
|
|
|
|
| seanpaulmc |
Jul 28 2026, 08:19 AM
Post
#11
|
|
Member Group: Members Posts: 465 Joined: 6-December 16 From: Orlando, FL Member No.: 20,649 Region Association: South East States
|
QUOTE(914werke @ Jul 28 2026, 08:44 AM)  Fred do a search on 914werke & "sway bar links" (or some variation) you should find a post where I detail the hot water process + a simple tool I made in 5 mins that made my production of links effortless. This form 914Werke. Some hot water and a simple dull, wooden 'pry bar' that won't pierce the bushing. Fred may be human after all? (IMG:style_emoticons/default/idea.gif) |
|
|
|
| 76-914 |
Jul 28 2026, 08:31 AM
Post
#12
|
|
Repeat Offender & Resident Subaru Antagonist Group: Members Posts: 13,986 Joined: 23-January 09 From: Temecula, CA Member No.: 9,964 Region Association: Southern California
|
QUOTE(Cairo94507 @ Jul 27 2026, 05:08 PM) We stuck the bushings in very hot water to get the pliable and then squeezed them in. Greased the ball and then popped them on with a big pair of channel lock pliers. (IMG:style_emoticons/default/beerchug.gif) Same here though I didn't heat the bushings. It might have been hot as Hell that day. Can't remember. It never fails that every time some problematic task occurs there are always 1 or 2 folks that breezed thru them w/o a hitch. We all go thru it one time or another. Go figure. (IMG:style_emoticons/default/confused24.gif) |
|
|
|
| friethmiller |
Jul 28 2026, 08:57 AM
Post
#13
|
|
Senior Member Group: Members Posts: 1,591 Joined: 10-February 19 From: Austin, TX Member No.: 22,863 Region Association: Southwest Region
|
QUOTE(seanpaulmc @ Jul 28 2026, 09:19 AM) Ha! Yes! Very much so. (IMG:style_emoticons/default/biggrin.gif) I'm still trying to figure things out all the time. After ruining 3 in-a-row... it was time to ask for help. The forum delivered too! Thanks guys. I got it all done. |
|
|
|
| TRP |
Jul 28 2026, 03:16 PM
Post
#14
|
|
Member Group: Members Posts: 460 Joined: 2-September 23 From: Morgan Hill, CA Member No.: 27,559 Region Association: None
|
QUOTE(friethmiller @ Jul 28 2026, 07:57 AM) The forum delivered too! Thanks guys. I got it all done. Was it simply starting with the 'open end' first and using glycerin? I tell you what, that simple change seemed like it made all the difference in the world for me. Glad you got it sorted out. |
|
|
|
| bkrantz |
Jul 28 2026, 07:54 PM
Post
#15
|
|
914 Guru Group: Members Posts: 8,812 Joined: 3-August 19 From: SW Colorado Member No.: 23,343 Region Association: Rocky Mountains
|
I checked my build photos and waaaaay back when I am pretty sure I used the hot water method to get the bushings into the links. Then to pop the links and bushings onto the sway bar and trailing arm balls I used trigger clamps. big and small.
Attached thumbnail(s) 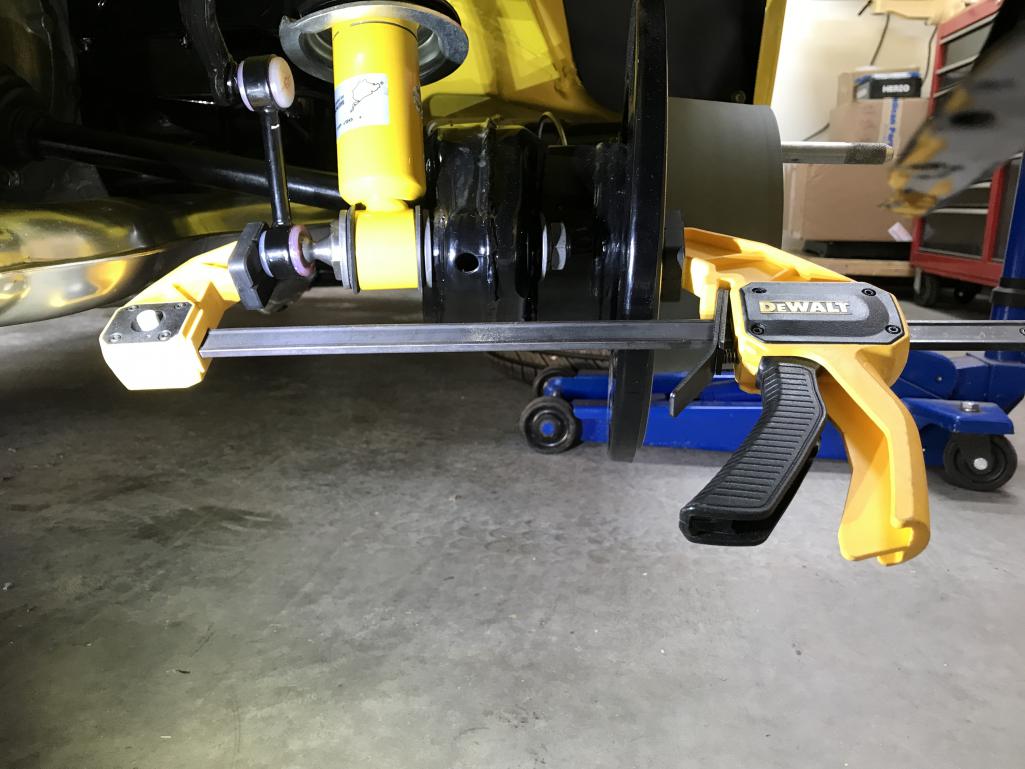
|
|
|
|
| TonyA |
Jul 29 2026, 09:23 AM
Post
#16
|
|
Nachmal Group: Members Posts: 725 Joined: 17-November 16 From: Hilltown PA Member No.: 20,596 Region Association: North East States
|
That's exactly how I did it but clamp the other way and on the shock nut.
|
|
|
|
| friethmiller |
Jul 29 2026, 09:33 AM
Post
#17
|
|
Senior Member Group: Members Posts: 1,591 Joined: 10-February 19 From: Austin, TX Member No.: 22,863 Region Association: Southwest Region
|
QUOTE(TRP @ Jul 28 2026, 04:16 PM) QUOTE(friethmiller @ Jul 28 2026, 07:57 AM) The forum delivered too! Thanks guys. I got it all done. Was it simply starting with the 'open end' first and using glycerin? I tell you what, that simple change seemed like it made all the difference in the world for me. Glad you got it sorted out. Couple of things. 1) getting it in the vice allows both hands on the bushing; 2) warming it helps; 3) using a hard plastic or wood pry tool that doesn't dig into the bushing None of this is required, though. I found a YouTube short where this guy inserted one cold, with this bare hands, on a bench. (IMG:style_emoticons/default/blink.gif) |
|
|
|
| TRP |
Jul 29 2026, 11:59 AM
Post
#18
|
|
Member Group: Members Posts: 460 Joined: 2-September 23 From: Morgan Hill, CA Member No.: 27,559 Region Association: None
|
QUOTE(friethmiller @ Jul 29 2026, 08:33 AM) None of this is required, though. I found a YouTube short where this guy inserted one cold, with this bare hands, on a bench. (IMG:style_emoticons/default/blink.gif) Witchcraft!! Pure witchcraft. |
|
|
|
| Steve |
Oct 23 2026, 10:43 PM
Post
#19
|
|
914 Guru Group: Members Posts: 6,104 Joined: 14-June 03 From: Laguna Niguel, CA Member No.: 822 Region Association: Southern California
|
I just went through this nightmare trying to reinstall my rear sway bar. I bought a bunch of lemforder bushings from Pelican. They were the dreaded white ones. I was able to boil them and install them in the drop links. However I could not get them to install on the sway bar and shocks. I then ordered some more bushings from Sierra Madre. They sent me three rubber ones and one white one. After seeing this post, I decided to try my harbor freight blow dryer and my harbor freight trigger clamp with the previous lemforder bushings. After about 25 seconds with the dryer on high they popped on. I also bought a set of factory bushings and they look the same as the lemforder bushings.
|
 |
|
|
3 User(s) are reading this topic (2 Guests and 0 Anonymous Users)
1 Members: porschetub

|
Lo-Fi Version | Time is now: 23rd October 2026 - 11:45 PM |
Invision Power Board
v9.1.4 © 2026 IPS, Inc.